
Best Video Editing Tools to Buy in July 2026
![Adobe Premiere Elements 2026 | Software Download | Video Editing | 3-year term license | Activation Required [PC/Mac Online Code]](https://cdn.blogweb.me/1/51q_VIY_2_Zcy_L_SL_160_ea71504d8a.jpg)
Adobe Premiere Elements 2026 | Software Download | Video Editing | 3-year term license | Activation Required [PC/Mac Online Code]
-
AI-POWERED EDITING: TRIM, ENHANCE, AND CREATE EFFORTLESSLY!
-
SHARE IN STYLE: COLLAGES, SLIDESHOWS, AND HIGHLIGHT REELS AWAIT!
-
FULL 3-YEAR ACCESS: NO RENEWAL HASSLES, JUST SEAMLESS CREATIVITY!
![Adobe Premiere Elements 2026 | Software Download | Video Editing | 3-year term license | Activation Required [PC/Mac Online Code]](https://cdn.flashpost.app/flashpost-banner/brands/amazon.png)
![Adobe Premiere Elements 2026 | Software Download | Video Editing | 3-year term license | Activation Required [PC/Mac Online Code]](https://cdn.flashpost.app/flashpost-banner/brands/amazon_dark.png)

Adobe Premiere Pro | Video Editing and Production Software | 12-Month Subscription with Auto-Renewal, PC/Mac
- LINK NEW SUBSCRIPTIONS ONLY AFTER CURRENT TERM ENDS; PLAN AHEAD!
- ACHIEVE FLAWLESS PRODUCTIONS WITH ADVANCED EDITING AND AUDIO TOOLS.
- COMPATIBLE WITH ALL FORMATS, FROM 8K TO VR-EDIT YOUR WAY!

Adobe Premiere Pro | Video editing and production software | 1-month Subscription with auto-renewal, PC/Mac
- TRANSITION SEAMLESSLY AFTER CURRENT TERM: NO SERVICE GAPS!
- ENHANCE STORYTELLING WITH HOLLYWOOD-LEVEL EDITING TOOLS.
- UNLOCK CREATIVITY: EDIT IN ANY FORMAT, FROM 8K TO VR!
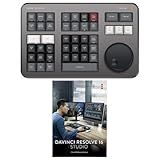
Blackmagic Design Davinci Resolve Speed Editor Bundle with Davinci Resolve 18 Studio (Activation Card)
- COMPACT DESIGN WITH BUILT-IN BATTERY FOR ON-THE-GO EDITING.
- USER-FRIENDLY SEARCH DIAL FOR FAST, EFFICIENT NAVIGATION.
- INCLUDES DAVINCI RESOLVE 17 STUDIO FOR ENHANCED EDITING POWER.
![Corel Photo Video Ultimate Bundle 2023 | PaintShop Pro 2023 Ultimate and VideoStudio Ultimate 2023 | Powerful Photo and Video Editing Software [PC Download]](https://cdn.blogweb.me/1/51lv_SJ_7f_Mn_L_SL_160_e3df0bd45b.jpg)
Corel Photo Video Ultimate Bundle 2023 | PaintShop Pro 2023 Ultimate and VideoStudio Ultimate 2023 | Powerful Photo and Video Editing Software [PC Download]
-
UNLOCK PRO-LEVEL EDITING WITH AI ENHANCEMENTS AND UNIQUE WORKSPACES!
-
CREATE STUNNING VIDEOS EFFORTLESSLY WITH INTUITIVE FEATURES AND EFFECTS!
-
ENJOY SUBSCRIPTION-FREE ACCESS AND RESOURCES FOR ALL SKILL LEVELS!
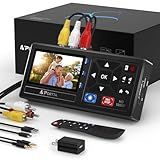
Portta VHS to Digital Converter, Video to Digital Recorder with Remote, Compatible with VHS, VCR, DVR, DVD, Hi8, Mini DV Players, Camcorder, Gaming Consoles (Tapes/DVD Player Not Included)
-
EFFORTLESS 1080P CONVERSION: CONVERT ANALOG TO DIGITAL WITH EASE!
-
DIRECT PLAYBACK: VIEW AND PLAY BACK RECORDINGS ON THE DEVICE DIRECTLY.
-
BROAD COMPATIBILITY: DIGITIZE FROM VARIOUS LEGACY VIDEO SOURCES EFFORTLESSLY.
![VEGAS Pro Edit 21 - The creative standard for video and audio | video editing software | video cutting software | video editor | 1 license [PC Online code]](https://cdn.blogweb.me/1/513_H32_O_Lp2_L_SL_160_3bf8a0ba65.jpg)
VEGAS Pro Edit 21 - The creative standard for video and audio | video editing software | video cutting software | video editor | 1 license [PC Online code]
-
STREAMLINED EDITING: EFFORTLESSLY CREATE YOUTUBE AND CINEMATIC VIDEOS FAST.
-
FREE AI TOOLS: ENHANCE PROJECTS WITH ADVANCED AI EFFECTS AND REPAIRS.
-
ALL-IN-ONE FEATURES: ACCESS POWERFUL TOOLS FOR STUNNING VISUALS AND AUDIO.

Adobe Acrobat Pro | PDF Software | Convert, Edit, E-Sign, Protect | PC/Mac Online Code | Activation Required
- EFFORTLESSLY EDIT PDFS AND IMAGES WITHOUT SWITCHING APPS.
- SECURELY E-SIGN DOCUMENTS ANYTIME, ANYWHERE-NO LOGIN NEEDED.
- COLLABORATE SEAMLESSLY WITH COMMENTING AND SECURE PDF SHARING.

Adobe Audition | Audio recording, editing, and mixing software |1-month Subscription with auto-renewal, PC/Mac
- SEAMLESSLY ENHANCE AUDIO WITH COMPREHENSIVE EDITING TOOLS.
- BOOST VIDEO PRODUCTION EFFICIENCY WITH A POWERFUL AUDIO WORKSTATION.
- CREATE PRISTINE SOUND EFFECTS USING MULTITRACK AND SPECTRAL DISPLAYS.
![VEGAS Pro 18 Edit – Professional video editing [PC Download]](https://cdn.blogweb.me/1/41pu_GQ_Jz_3_L_SL_160_588d8144b9.jpg)
VEGAS Pro 18 Edit – Professional video editing [PC Download]
- TRANSFORM STYLES AND ADD COLOR WITH AI-DRIVEN TOOLS.
- EXPERIENCE LIGHTNING-FAST PERFORMANCE WITH HARDWARE ACCELERATION.
- ACHIEVE STUNNING VISUALS WITH ADVANCED COLOR GRADING OPTIONS.
In Premiere Pro, adding sequences is a simple process. To create a new sequence, follow these steps:
- Launch Adobe Premiere Pro and open a new project or an existing one.
- In the Media Browser panel, locate and select the footage you want to create a sequence with.
- Drag the selected footage from the Media Browser panel onto the "New Item" button at the bottom of the Project panel. Alternatively, you can right-click on the footage and choose "New Sequence from Clip" or use the keyboard shortcut Ctrl+Alt+N (Windows) or Cmd+Opt+N (Mac).
- A dialog box will appear, providing various options for creating a new sequence. Here, you can customize the sequence settings like sequence presets, video tracks, audio tracks, frame rate, resolution, and more according to your project requirements.
- Once you've selected the desired settings, click on the "OK" button.
- The newly created sequence will appear in the Project panel. You can now drag and drop additional clips onto the sequence in the Timeline panel to add them to it.
- To adjust the order of the clips, simply drag and drop them to rearrange them within the sequence.
- If needed, you can also trim the clips by clicking on them in the Timeline panel and using the Trim tool or keyboard shortcuts such as "C" for the Razor tool or "V" for the Selection tool.
- To preview your sequence, use the Play button in the Program Monitor panel, or hit the spacebar on your keyboard to start and stop playback.
- Finally, make sure to save your project by going to File > Save or using the keyboard shortcut Ctrl+S (Windows) or Cmd+S (Mac) to avoid losing any changes.
That's all! By following these steps, you can easily add sequences to your project in Premiere Pro and start editing your footage.
How to add captions or subtitles to a sequence in Premiere Pro?
To add captions or subtitles to a sequence in Premiere Pro, follow these steps:
- Open your Premiere Pro project and navigate to the sequence where you want to add the captions.
- Go to the "Window" menu and select "Captions" to open the Captions panel.
- In the Captions panel, click on the "New Caption" button, or use the keyboard shortcut "Ctrl" + "T" (Windows) or "Cmd" + "T" (Mac).
- This will create a new caption track on your timeline, displayed as a purple bar above your video track.
- In the Captions panel, you can enter the text for your captions by selecting the numbered caption box and typing the corresponding text.
- Customize the appearance of the captions by adjusting the font, size, color, background, and other options available in the Captions panel.
- To adjust the timing of the captions, you can click and drag the captions on the timeline to match the desired timing.
- If you have an external caption file (such as an SRT file), you can import it into Premiere Pro by clicking on the "Import Caption File" button in the Captions panel.
- After importing the caption file, it will appear on the timeline, and you can adjust its timing and appearance as needed.
- Once you are satisfied with the captions, you can export your sequence with captions included by going to "File" > "Export" > "Media" and selecting the desired export settings.
- Make sure to enable the "Include Captions" option in the export settings to ensure that the captions are included in the exported video.
Note: You can also add closed captions by following similar steps, but you will need to have a closed caption file in a specific format, such as SCC or MCC, which can be imported into Premiere Pro.
What is the shortcut for creating a new sequence in Premiere Pro?
The shortcut for creating a new sequence in Premiere Pro is "Ctrl + N" on Windows or "Cmd + N" on Mac.
How to duplicate a sequence in Premiere Pro?
To duplicate a sequence in Premiere Pro, you can follow these steps:
- Open Premiere Pro and navigate to the project panel (by default, it is located in the lower-left corner).
- Find the sequence you want to duplicate in the project panel.
- Right-click on the sequence and select "Duplicate" from the context menu.
- A new duplicated sequence will appear in the project panel with the same name as the original sequence but with "copy" added to the end of the name.
- You can now drag and drop the duplicated sequence onto the timeline or use it as needed in your project.
Note: Duplicating a sequence creates an independent copy of the original sequence. Any changes made to the duplicated sequence will not affect the original sequence and vice versa.
How to adjust the audio levels in a sequence in Premiere Pro?
To adjust the audio levels in a sequence in Premiere Pro, follow these steps:
- Open Premiere Pro and import your video and audio clips into the project.
- Create a new sequence by dragging the video clip onto the "New Item" button in the project panel, or by going to File > New > Sequence.
- Drag the video and audio clips from the project panel into the sequence timeline.
- Select the audio clip in the timeline by clicking on it.
- In the "Effect Controls" panel, you will see the audio effects options. Click on the triangle next to "Audio Effects" to reveal the options.
- Under "Audio Effects," click on the triangle next to "Level" to reveal the audio level options.
- Adjust the audio level by dragging the "Volume" slider left or right, or by typing in a specific value in the box next to the slider.
- You can preview the audio levels by playing the sequence or using the playhead to scrub through the sequence.
- Continue adjusting the audio levels of each clip in the sequence as necessary.
- To adjust the overall audio level of the sequence, you can use the "Audio Track Mixer." Go to Window > Audio Track Mixer to open it. From there, you can adjust the master audio level, as well as individual tracks if needed.
- Once you are satisfied with the audio levels in your sequence, you can export your video with the adjusted audio levels.
Remember to save your project regularly to avoid losing any changes.
How to import a sequence into Premiere Pro?
To import a sequence into Premiere Pro, follow these steps:
- Open Premiere Pro and create a new project.
- In the Project panel, navigate to the location where your sequence file is stored.
- Right-click on the Project panel and select "Import."
- In the file selection dialog box, locate and select your sequence file.
- Click on the "Import" button to import the sequence into your project.
- The sequence will appear in the Project panel, and you can drag and drop it to the Timeline panel to start editing.
Note: A sequence is typically saved as a separate project file (.prproj) or as a Premiere Pro sequence file (.xml, .aaf, etc.). Make sure you have the appropriate file format for importing.
Additionally, if you have a Premiere Pro project file (.prproj) that contains the desired sequence, you can directly open the project file to access the sequence within it.
What is the benefit of duplicating a sequence in Premiere Pro?
Duplicating a sequence in Premiere Pro offers several benefits:
- Experimentation: Duplicating a sequence allows you to create an identical copy of your original sequence, providing you with the freedom to experiment with different edits, effects, or changes without affecting the original sequence. This helps you save time by not having to recreate everything from scratch if you decide to revert to the original version.
- Versioning: Duplicating a sequence allows you to create different versions or variations of your edit. For example, you may want to create a shorter version of your video for social media platforms or a longer version for a director's cut. By duplicating the sequence, you can easily make these changes without altering the original edit.
- Collaboration: Duplicating a sequence is helpful when multiple editors or collaborators are working on the same project. Each editor can have their own version of the sequence, allowing them to make changes or try different approaches without interfering with the work of others. This helps streamline the collaborative editing process.
- Backup: Duplicating a sequence can serve as a backup or safety net. If you make significant changes to your edit and want to have a backup of the original sequence, duplicating it ensures that you have a saved version to fall back on if needed.
In summary, duplicating a sequence in Premiere Pro offers flexibility, experimentation, collaboration, and backup options, which contribute to a more efficient and organized editing workflow.
How to delete a sequence in Premiere Pro?
To delete a sequence in Premiere Pro, follow these steps:
- Open your Premiere Pro project.
- In the Project panel, locate the sequence that you want to delete. It will be listed under the "Sequences" folder.
- Right-click on the sequence and select "Delete" from the context menu. Alternatively, you can click on the sequence and press the "Delete" key on your keyboard.
- A confirmation dialog box will appear asking if you want to delete the sequence permanently. Click "OK" to confirm the deletion.
The sequence will now be removed from your Premiere Pro project.