
Best Microphone Accessories to Buy in July 2026
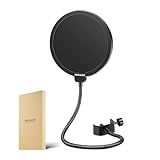
Neewer Professional Microphone Pop Filter Shield Compatible with Blue Yeti and Any Other Microphone, Dual Layered Wind Pop Screen With A Flexible 360 Degree Gooseneck Clip Stabilizing Arm
- DUAL-LAYER DESIGN ENSURES CRYSTAL-CLEAR RECORDINGS AND ELIMINATES PLOSIVES.
- ADJUSTABLE GOOSENECK FOR PERFECT POSITIONING-CUSTOM FIT FOR EVERY VOICE.
- WIDE COMPATIBILITY WITH VARIOUS MIC STANDS FOR EFFORTLESS SETUP AND USE.


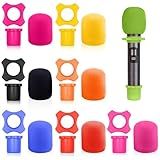
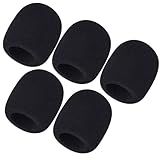
Barafat 8 Set Shakeproof Anti-Rolling Handheld Microphone Silicone Ring, Colorful Microphone Foam Windscreen Covers for KTV, Interview, Recording Studio, Performance, Speech
-
8 COLOR OPTIONS: FRESHEN UP YOUR MIC WITH VIBRANT, VERSATILE COLORS.
-
SUPERIOR PROTECTION: DURABLE MATERIALS SAFEGUARD YOUR MIC FROM DAMAGE.
-
UNIVERSAL FIT: PERFECT FOR MOST MICROPHONES-IDEAL FOR ANY EVENT!
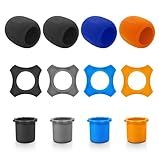
12 Pieces Shakeproof Anti-Rolling Handheld Microphone Windscreen Foam Cover & Mic Protection Silicone Ring & Bottom Rod Sleeve Holder Set for KTV Device(Color Random)
-
VERSATILE PROTECTION: SHIELDS MICS FROM SHOCKS AND DIRT EFFECTIVELY.
-
REUSABLE & WASHABLE: ECO-FRIENDLY CHOICE FOR LONG-LASTING USE.
-
FITS MOST MICS: IDEAL FOR PARTIES, EVENTS, AND HOME USE!
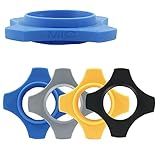
Cionyce 4 Pcs Microphone Anti-Roll Rubber Rings Mic Rolling Protection Anti-Slip Rubber Rolling Rings(Multi Color)
-
VERSATILE USE FOR MICROPHONES: PERFECT FOR KTV, STUDIOS, AND INTERVIEWS.
-
DURABLE RUBBER MATERIAL: LONG-LASTING AND RESISTANT TO DEFORMATION.
-
SATISFACTION GUARANTEED: EXCELLENT AFTER-SALES SERVICE FOR COMPLETE PEACE OF MIND.
Mudder 5 Pack Foam Mic Cover Handheld Microphone Windscreen (5 Pack)
-
UNIVERSAL FIT: PERFECT FOR MOST STANDARD HANDHELD MICROPHONES!
-
SOFT & DURABLE: THICK FOAM FOR COMFORT AND EXCELLENT SOUND QUALITY.
-
HYGIENIC PROTECTION: KEEPS MICS CLEAN FROM MOISTURE AND SALIVA!
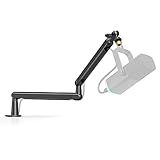
FIFINE Microphone Boom Arm, Low Profile Adjustable Stick Microphone Arm Stand with Desk Mount Clamp, Screw Adapter, Cable Management, for Podcast Streaming Gaming Studio-BM88
-
STURDY BUILD: ALL-METAL DESIGN ENSURES STABILITY FOR GAMING AND STREAMING.
-
SPACE-SAVING DESIGN: LOW PROFILE EXTENDS UNDER SCREENS, MAXIMIZING WORKSPACE.
-
VERSATILE COMPATIBILITY: INCLUDES MULTIPLE ADAPTERS FOR EASY MICROPHONE SETUP.
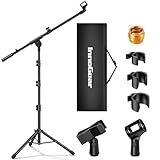
InnoGear Microphone Stand, Tripod Boom Arm Floor Mic Stand Height Adjustable Heavy Duty with Carrying Bag 2 Mic Clips 3/8" to 5/8" Adapter for Singing Podcast for Blue Yeti Shure SM58 SM48 Samson Q2U
-
VERSATILE HEIGHT ADJUSTMENT: PERFECT FOR ALL AGES, 28.1 TO 89.8.
-
STABLE & DURABLE DESIGN: HEAVY 4.0LBS TRIPOD ENSURES ROCK-SOLID SUPPORT.
-
FLEXIBLE BOOM ARM: ADJUSTABLE 16-30 ARM FOR CUSTOMIZED ANGLES AND LENGTHS.
To remove wind noise in Adobe Premiere Pro, follow these steps:
- Open your project in Adobe Premiere Pro.
- Import the video clip or audio file that contains the wind noise into your project.
- Drag the clip or audio file onto the timeline, then right-click on it and select "Unlink."
- This will separate the audio from the video clip, allowing you to work on the audio separately.
- Select the audio clip on the timeline, then go to the "Effects" panel.
- In the "Effects" panel, search for the "Dynamics Processing" effect and drag it onto the audio clip.
- Once the effect is applied, go to the "Effects Controls" panel.
- In the "Effects Controls" panel, adjust the settings of the "Dynamics Processing" effect according to your preferences.
- Start by increasing the "Threshold" parameter to determine the level at which the wind noise will be reduced. Adjust it until the wind noise is significantly reduced but the desired audio remains intact.
- You can also play around with other parameters like "Ratio," "Attack," and "Release" to further fine-tune the noise reduction.
- If necessary, you can add additional effects like "Noise Gate" and "Equalizer" to further reduce or eliminate wind noise.
- Preview your edited audio clip to ensure that the wind noise has been effectively reduced.
- Once satisfied, you can link the audio and video clips together again by right-clicking on the clip and selecting "Link."
- Finally, export and save your project, making sure to choose the desired video and audio settings.
Following these steps should help you remove wind noise from your audio clips using Adobe Premiere Pro.
How to remove wind noise in Adobe Premiere Pro?
To remove wind noise in Adobe Premiere Pro, you can follow these steps:
- Import the footage: Open Premiere Pro and create a new project. Import the footage with wind noise into your project by using the "Import" button.
- Isolate the audio: Locate the video clip in the project panel, right-click, and select "New Sequence from Clip." This action will create a new sequence with the same settings as your footage.
- Apply the 'Dynamics' effect: Go to the Effects panel, search for the "Dynamics" effect, and drag it onto the audio clip in the sequence. The Dynamics effect helps in reducing background noise, such as wind.
- Adjust the effect settings: In the Effects Control panel, you will find the options for the Dynamics effect. There are two main sections to adjust: "Reduced Gain" and "Threshold." a) Reduced Gain: This controls the amount of noise reduction. Lower values provide more reduction. Start by setting it around -8 or -10 dB and listen to the result. Increase or decrease it based on the desired outcome. b) Threshold: This sets the level at which the effect starts reducing the noise. Set it to a value where it captures the wind noise but doesn't affect the primary audio too much.
- Fine-tune parameters: In addition to the above steps, you can experiment with other settings like Attack, Release, Hold, and Noise Gate to achieve better results. These settings control how quickly the effect acts on the wind noise and how it interacts with the rest of the audio.
- Preview and adjust: Play the clip in the timeline to preview the effect. If needed, make further adjustments to the Reduced Gain, Threshold, or other effect settings until you achieve the desired wind noise reduction.
- Render and export: Once you are satisfied with the result, render the project and export it in your desired format.
Remember, wind noise removal is not a perfect science, and it may slightly affect the overall audio quality. It's always a good idea to record high-quality audio outdoors or use external wind protection devices while filming to minimize wind noise.
What are the disadvantages of removing wind noise in post-production?
While there are advantages to removing wind noise in post-production, there are also some potential disadvantages to consider. These include:
- Incomplete removal: Completely removing wind noise from an audio recording can be challenging, especially if the wind noise is heavy or intertwined with other important audio elements. This may result in an incomplete removal, where remnants of wind noise still remain in the final audio.
- Artificial sound: The process of removing wind noise often involves using tools like noise reduction or equalization which can alter the original audio quality. These adjustments may introduce artifacts or artifacts such as unnatural tonal changes or fluctuations, making the resulting audio sound artificial or processed.
- Loss of subtle audio details: Wind noise removal techniques can sometimes remove not just the unwanted wind noise, but also subtle audio details such as rustling leaves or ambiance. This can make the audio sound sterile or devoid of natural elements, potentially altering the intended atmosphere or context.
- Time-consuming process: Removing wind noise in post-production requires dedicated time and effort. It involves analyzing the audio waveform, applying filters or techniques, and repeatedly fine-tuning the parameters. This process can be time-consuming, especially if the recording contains a considerable amount of wind noise throughout.
- Reduction in overall audio quality: Aggressive or improper wind noise removal can degrade the overall audio quality. Overuse of noise reduction techniques may result in audio artifacts, loss of clarity, or diminished dynamics. This can negatively impact the listening experience and compromise the integrity of the recording.
- Limited control over wind noise characteristics: It is important to note that not all wind noise is the same. Removing wind noise in post-production generally involves applying general noise reduction techniques, which may not always capture the specific characteristics of the wind noise in question. As a result, it may be difficult to precisely control or modify the wind noise removal process to match the desired outcome.
Ultimately, while removing wind noise can be beneficial, it's important to carefully evaluate these potential drawbacks and consider them in relation to the specific requirements of the audio content being edited.
What are some tips to prevent wind noise during outdoor video shooting?
- Use a windscreen or deadcat: Attach a windscreen or deadcat to your microphone. These accessories are designed to minimize wind noise by diffusing or blocking the wind from directly hitting the microphone.
- Position yourself properly: Try to find a location that provides some natural barriers against the wind, such as trees, walls, or hills. Position yourself and your camera in a way that minimizes the direct impact of wind on the microphone.
- Choose a directional microphone: If possible, use a directional microphone, such as a shotgun microphone, which is designed to pick up sound primarily from the front and reject sounds from the sides and rear. This helps to reduce wind noise, as the microphone is less likely to capture the gusts of wind.
- Use a microphone suspension or shock mount: These accessories can help to isolate the microphone from vibrations caused by wind or camera movements, reducing rumbling noise in the audio.
- Monitor and adjust audio levels: Keep an eye on your audio levels while shooting. Wind noise can cause sudden peaks in audio, which may result in distortion. Adjust the audio levels accordingly to avoid clipping or distortion caused by wind gusts.
- Use post-processing techniques: If you still end up with some wind noise in your recorded audio, you can use audio editing software to reduce or eliminate it. Apply noise reduction filters or equalization adjustments to minimize the wind noise while preserving the desired audio.
- Consider using a lavalier microphone: If your shooting conditions allow, consider using a lavalier microphone instead of a camera-mounted microphone. Lavalier microphones are generally more discreet and less susceptible to wind noise due to their close proximity to the source (e.g., attached to the clothing of the person speaking).
Remember, avoiding wind noise entirely can be difficult, especially in very windy environments. However, by employing these tips, you can significantly reduce wind noise and improve the overall audio quality of your outdoor video shoots.
How to use the "DeEsser" effect to minimize wind noise in Premiere Pro?
To use the "DeEsser" effect in Premiere Pro to minimize wind noise, follow these steps:
- Open Premiere Pro and import your footage into the project panel.
- Drag and drop the footage onto the timeline.
- Select the audio clip in the timeline and go to the "Effects" panel.
- In the "Effects" panel, search for "DeEsser" using the search bar at the top.
- Once you find the "DeEsser" effect, drag and drop it onto the audio clip in the timeline.
- With the audio clip selected, go to the "Effects Controls" panel.
- In the "Effects Controls" panel, adjust the "Frequency" parameter of the "DeEsser" effect to target the wind noise frequency. Start by setting a value close to the frequency of the wind noise.
- Play your timeline to hear the effect and adjust the "Frequency" parameter further if needed. You may need to experiment with different frequencies to find the best result.
- Additionally, you can adjust the "Threshold" parameter to control how much the "DeEsser" reduces the wind noise. Increase the threshold to lessen the effect, or decrease it to apply more noise reduction.
- Fine-tune other "DeEsser" parameters such as "Attack" and "Release" to get the desired effect. These parameters control how quickly the effect engages and disengages.
- Continue adjusting the parameters until you achieve the desired reduction of wind noise.
- Once you are satisfied with the results, you can proceed with further editing or export your footage.
Remember, wind noise can be tricky to remove completely, especially if it is very loud or if it overlaps with important audio. It's always best to try and minimize wind noise while recording by using windshields or other physical tools. However, the "DeEsser" effect can help reduce its impact.
What is the impact of wind speed on the intensity of wind noise in videos?
The impact of wind speed on the intensity of wind noise in videos can be significant. Higher wind speeds generally result in louder and more noticeable wind noise in videos. This is because stronger winds cause higher pressure differentials, resulting in increased air movement and turbulence around the microphone.
When recording videos outdoors, the microphone on the camera or smartphone is often exposed to the surrounding environment, including wind. As wind speed increases, it can generate more turbulence and air movement, leading to a greater chance of wind directly hitting the microphone or causing turbulent air movement around it. This results in the microphone capturing the sound of the wind, which can overpower other desired sounds and distract listeners.
To minimize wind noise, there are various methods and tools available, such as windshields, windscreens, or furry covers that can be placed over the microphone to reduce the direct impact of wind. These accessories work by diffusing the airflow and reducing the velocity at which wind reaches the microphone, thereby diminishing the noise generated.
However, it is important to note that even with wind protection, high wind speeds can still have a significant impact on the audio quality of videos. Therefore, it is often advisable to choose recording locations with lower wind speeds or use additional audio recording equipment, such as external microphones with better wind-reduction capabilities, to ensure clearer sound in windy conditions.
What is the difference between wind noise and background noise in videos?
Wind noise refers specifically to the unwanted sound caused by the movement of air during recording, commonly seen in outdoor or windy environments. It is characterized by a distinct rushing or whooshing sound that can often overwhelm or distort the desired audio. Wind noise can be quite distracting and make it difficult to hear the main audio content.
On the other hand, background noise generally refers to any unwanted ambient sound present in a video recording. It can include various sounds that are not intended to be the primary focus of the audio, such as footsteps, traffic, conversation, or machinery. Background noise can result from the environment where the video is recorded, improper sound insulation, or poor recording equipment.
The key difference lies in their source: wind noise is specifically caused by the movement of air, while background noise encompasses a broader range of unwanted sounds in the recording environment.
How to preserve the natural sound while removing wind noise in Premiere Pro?
To preserve the natural sound while removing wind noise in Adobe Premiere Pro, you can follow these steps:
- Import your video clip with wind noise into Premiere Pro.
- Right-click the video clip in the Project panel and select "New Sequence from Clip" to create a new sequence with matching settings.
- Drag the sequence to the timeline.
- Select the audio clip in the timeline and go to the "Effects" panel.
- Search for and apply the "Dynamics" effect to the audio clip.
- In the Effects Control panel, adjust the "Adaptive Noise Reduction" settings to reduce the wind noise. Start by gradually increasing the "Reduce by" value until the wind noise is reduced but the desired audio is preserved. Be careful not to overdo it as this can lead to unnatural sound artifacts.
- Toggle the "Preview" button in the Effects Control panel to compare the original audio with the reduced wind noise.
- If necessary, apply additional audio effects like Equalizer or Highpass Filter to further enhance the sound quality while reducing wind noise. Experiment with these effects to find the best settings that maintain a natural sound.
- Preview the edited audio clip to ensure the wind noise is reduced without significantly affecting the natural sound.
- Once satisfied, export your final video with the preserved natural sound and reduced wind noise.
Remember to always listen carefully to the audio while tweaking the settings to achieve the desired result without compromising the natural sound quality.
What is the best way to equalize audio in Premiere Pro to remove wind noise?
To equalize audio in Premiere Pro and remove wind noise effectively, follow these steps:
- Start by selecting the audio clip in your timeline.
- Open the Effects panel and search for the "Parametric Equalizer" effect.
- Drag and drop the effect onto the audio clip.
- In the Effects Control panel, click on the Edit button next to the effect name to open the Equalizer settings.
- Locate the dominant frequency range of the wind noise by playing back the clip.
- Adjust the Equalizer settings to reduce the prominence of those frequencies. This can be done by lowering the bars in the frequency spectrum where the wind noise is most noticeable.
- It's recommended to experiment with resetting individual bands, adjusting gain, and modifying bandwidth (Q-factor) to fine-tune the equalization.
- Preview the audio clip to ensure the wind noise has been adequately reduced. Adjust the settings as needed until the desired result is achieved.
- If necessary, you can further enhance the audio by adding additional filters or effects, such as a Noise Gate or DeEsser, to minimize other unwanted elements.
- Finally, render or export your edited audio with the equalization applied.
Remember, wind noise reduction may not completely eliminate all traces of wind, especially if it is excessively loud or present throughout the entire clip. Using a high-quality microphone with a windscreen during the recording process can significantly reduce the need for extensive equalization.
How to adjust the sensitivity of noise reduction in Premiere Pro for wind noise removal?
To adjust the sensitivity of noise reduction in Premiere Pro for wind noise removal, you can follow these steps:
- Import your footage into Premiere Pro and place it in the timeline.
- Select the clip with wind noise and ensure it is selected in the timeline.
- Go to the Effects panel and search for the "Adaptive Noise Reduction" effect. Drag and drop it onto the selected clip in the timeline.
- In the Effects Control panel, you'll see options for the Adaptive Noise Reduction effect. Look for the "Noise Reduction" parameter and adjust it to increase or decrease the sensitivity of noise reduction.
- While adjusting the noise reduction sensitivity, keep an eye on the audio waveform of the clip in the timeline. You can zoom in to see the details and observe any changes in the wind noise.
- Make subtle adjustments to the sensitivity until you achieve the desired reduction in wind noise. Be careful not to overdo it, as it might affect the overall audio quality or introduce artifacts.
- Additionally, you can also adjust other parameters like "Reduce By" and "Sharpness" to further refine the noise reduction effect according to your footage and preferences.
- Preview the clip in the timeline to check if the wind noise is adequately reduced. If not, go back and make further adjustments until you are satisfied.
Remember, removing wind noise from audio can be a challenging task, and it may not always be possible to completely eliminate it. It's important to find the right balance between reducing wind noise and maintaining the overall audio quality.