Best Video Editing Tools to Buy in July 2026
XPPen Mini Keydial ACK05 Wireless Shortcut Keyboard Bluetooth Programmable Express Remote Control with Dial & Customized Express Keys for Drawing Tablet PC MacBook Windows Images Video Editing
- THREE CONNECTION MODES FOR FLEXIBLE WORKSPACE EFFICIENCY.
- CUSTOMIZE 40 SHORTCUTS FOR TAILORED PRODUCTIVITY IN ANY SCENARIO.
- 300-HOUR BATTERY LIFE ENSURES UNINTERRUPTED CREATIVE FLOW.


Movie Film Clap Board, Hollywood Clapper Board Wooden Film Movie Clapboard Accessory with Black & White, 12"x11" Give Away White Erasable Pen
-
NATURAL WOOD DESIGN ENHANCES AUTHENTICITY FOR FILMS AND EVENTS.
-
INCLUDES ERASABLE PEN FOR EASY SCENE MARKING AND REWRITES.
-
VERSATILE FOR PARTIES, EVENTS, AND PROFESSIONAL PHOTOGRAPHY SHOOTS.
TourBox NEO - Customizable Editing Controller, Photo Color Grading Illustration Speed Editor, Intuitive Control Boost Productivity, Programmable Keyboard for Adobe CSP and More, Works with Mac/PC
- ZERO-LATENCY PERFORMANCE: EXPERIENCE SEAMLESS, STABLE CREATIVITY WIRED.
- ENTRY-LEVEL CONTROLLER: BOOST DRAWING & EDITING EFFICIENCY FOR CREATORS.
- EXTENSIVE SOFTWARE SUPPORT: COMPATIBLE WITH LEADING CREATIVE APPS & TOOLS.
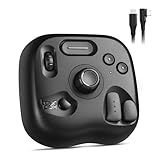
USB C Lavalier Microphone Wireless Mini Mic for Type-C Android Phone/Tablet/PC Video Recording Clip-on Mics with Rotatable Clip&Denoise Recording, Ideal for Vlog Tiktok Youtube Podcast Content Creator
- EXCEPTIONAL SOUND CLARITY WITH DUAL NOISE REDUCTION MODES.
- EFFORTLESS PLUG-AND-PLAY SETUP; INTUITIVE USER-FRIENDLY INTERFACE.
- LONG BATTERY LIFE: 6-12 HOURS OF RECORDING ON A SINGLE CHARGE.
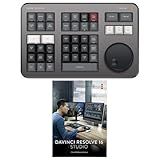
Blackmagic Design Davinci Resolve Speed Editor Bundle with Davinci Resolve 18 Studio (Activation Card)
- COMPACT DESIGN: EASILY PORTABLE WITH A BUILT-IN BATTERY.
- QUICK ACCESS: BUILT-IN SEARCH DIAL FOR EFFICIENT EDITING.
- COMPLETE PACKAGE: INCLUDES DAVINCI RESOLVE 17 STUDIO ACTIVATION.
TourBox Lite - Editing Keyboard Compact, Artists Go-to Drawing Macro Keypad, Works with Photoshop, CSP & More, Creative Controller with Custom Software, Streamline All Workflows - Wired Only
- TRANSFORM CREATIVITY WITH 50+ ACTIONS AND EYE-FREE CONTROL.
- MASTER DESIGN TOOLS IN DAYS-NO COMPLEX SHORTCUTS NEEDED!
- NATURAL GRIP DESIGN EASES HAND STRAIN FOR LONG CREATIVE SESSIONS.
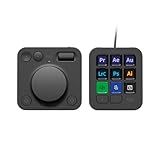
Logitech MX Creative Console, 9 Customizable LCD Keys, Stream Deck Accessories,Connectivity Technology USB-C, Control Dial for Graphic Design, Zoom, Spotify - Graphite, 3-Month Adobe Cloud Membership
-
STREAMLINE YOUR WORKFLOW: ACCESS TOOLS FAST WITH CUSTOMIZABLE CONTROLS.
-
MAXIMIZE APP EFFICIENCY: TAILOR 15 PROFILES FOR YOUR FAVORITE SOFTWARE.
-
BONUS ADOBE ACCESS: GET 3 MONTHS OF ADOBE CREATIVE CLOUD FREE!
To highlight text in Adobe Premiere, follow these steps:
- Open Adobe Premiere and create a new project or open an existing one.
- Import the footage or media files you want to work with into the project.
- Create a new title by going to the top menu and selecting "File" > "New" > "Title."
- In the title editing window, you can choose the font, size, style, and other formatting options for your text. Type the desired text in the preview area or paste it from an external source.
- To highlight the text, you can use the "Rectangle," "Ellipse," or any other shape tool available in the title editing window. Select the shape tool from the toolbar.
- Click and drag on the preview area to draw the shape over the text you want to highlight. You can adjust the size and position of the shape by clicking and dragging its edges.
- Customize the color, opacity, and other properties of the shape by using the options in the properties panel. You can select any color you want using the color picker or choose from predefined swatches.
- To make the shape blend in with the text, you can adjust its blending mode. Experiment with different blending modes like "Multiply," "Overlay," or "Screen" until you achieve the desired effect.
- Once you are satisfied with the highlighted text, close the title editing window. The highlighted text will now appear in your project's timeline.
- To apply the highlighted text to your video, drag and drop the title from the project panel onto the desired location in the timeline. You can adjust the duration and placement of the text in the timeline.
- Preview your video to see the highlighted text in action. Make any necessary adjustments as needed.
- Finally, when you are ready to export your video, go to the top menu and select "File" > "Export" > "Media." Choose your desired export settings and click on "Export" to save your video with the highlighted text.
That's it! You have successfully highlighted text in Adobe Premiere.
How to remove highlighted text from a video in Adobe Premiere?
To remove highlighted text from a video in Adobe Premiere, you can follow these steps:
- Open Adobe Premiere and import your video into the project.
- Drag and drop the video onto the timeline.
- Locate the text layer that contains the highlighted text in the timeline. It is usually represented as a separate layer above the video.
- Select the text layer by clicking on it.
- In the Effects Control panel, which you can find in the top-left corner of the interface, find the "Opacity" option.
- Reduce the opacity of the text layer to 0%. This will make the text layer invisible, effectively removing the highlighted text from the video.
- If the highlighted text has a different color or effect, you may need to apply additional adjustments to make it blend seamlessly with the video. You can experiment with color correction or blending modes to achieve the desired result.
Remember to save your changes and export the video once you're satisfied with the modifications.
How to create a text box in Adobe Premiere?
To create a text box in Adobe Premiere, follow these steps:
- Open Adobe Premiere and create a new project.
- Import your video footage or any other media files you plan to use.
- Go to "Graphics" tab in the top menu, and click on "Essential Graphics" to open the Essential Graphics panel.
- In the Essential Graphics panel, click on the "Text" tool to create a new text layer.
- Click and drag on the Program Monitor to define the size and position of the text box.
- In the "Edit" tab of the Essential Graphics panel, you can customize the text box by changing the font, style, size, and color.
- Once you have customized the text box, type in your desired text.
- To further refine the appearance of the text box, you can apply effects such as drop shadow, stroke, or background color using the controls available in the "Effects Controls" panel.
- You can also animate the text box by adding keyframes to properties like position, opacity, or scale in the "Effects Controls" panel.
- Once you have finished customizing the text box, you can drag and drop it onto the timeline to add it to your video.
That's it! Now you have created a text box in Adobe Premiere.
What is the difference between static and animated highlighted text in Adobe Premiere?
Static highlighted text refers to text that remains still and does not have any motion or animation applied to it. It typically appears as a solid color or with a static effect like a drop shadow or stroke.
On the other hand, animated highlighted text in Adobe Premiere involves adding movement or animation to the text. This can include effects like fading in or out, sliding in or out of the frame, scaling up or down, or any other motion or animation applied to the text to make it more visually engaging and dynamic.
In summary, static highlighted text is stationary and lacks movement, while animated highlighted text incorporates motion or animation effects to make the text more visually appealing and captivating.
How to create a text strip with highlighted sections in Adobe Premiere?
To create a text strip with highlighted sections in Adobe Premiere, you can follow these steps:
- Import your video footage into Adobe Premiere by going to "File" > "Import" and selecting the file from your computer.
- Drag the video footage onto the timeline at the bottom of the Adobe Premiere interface.
- Click on the "Text" tool from the toolbox on the left side of the screen. It looks like a "T" with a horizontal line underneath it.
- Click and drag on the timeline to create a text box on the video footage.
- Type the desired text into the text box. You can customize the font, size, and color by selecting the text and adjusting the options in the top toolbar.
- To highlight a section of the text, select the portion you want to highlight.
- In the top toolbar, click on the "Color" dropdown menu and choose a highlight color.
- Repeat steps 6 and 7 for each section you want to highlight.
- To further enhance the highlight effect, you can add a drop shadow or a stroke outline to the text. Select the text and go to "Effect Controls" in the top left corner of the interface. Under the "Opacity" section, you can adjust the opacity of the shadow or outline to your preference.
- Finally, adjust the duration of the text strip by clicking and dragging the edges of the text box on the timeline.
Once your text strip with highlighted sections is created, you can further edit and adjust it as needed.
How to apply a gradient effect to highlighted text in Adobe Premiere?
To apply a gradient effect to highlighted text in Adobe Premiere, follow these steps:
- Open the Adobe Premiere software on your computer and create a new project.
- Go to the "Graphics" workspace by selecting it from the top menu bar or using the shortcut Shift + 4.
- Click on the "Type Tool" from the Tools panel on the left side of the screen. Then, click on the Program Monitor to create a text box.
- Type your desired text into the text box. You can customize the font, size, and other text properties using the options in the Essential Graphics panel on the right side of the screen.
- With the text selected, go to the "Effects Controls" panel, which is usually located in the top-left corner of the screen. If you don't see the panel, go to the "Window" menu at the top and make sure "Effects Controls" is checked.
- Open the "Opacity" dropdown in the "Effects Controls" panel. You can find this by clicking on the triangle next to "Opacity."
- Click on the stopwatch icon next to "Opacity" to create a keyframe for the text's opacity.
- Move the playhead (the vertical line in the timeline) to the point where you want the gradient effect to start. Then, adjust the Opacity value to 100% to make the text fully opaque.
- Move the playhead to the point where you want the gradient effect to end. Adjust the Opacity value to 0% to make the text fully transparent.
- With the playhead still at the end point, go to the "Effect Controls" panel and search for the "Gradient Wipe" effect using the search bar at the top.
- Click and drag the "Gradient Wipe" effect onto the text clip in the Timeline.
- In the "Effect Controls" panel, click on the small stopwatch icon next to "Transition Completion" to create a keyframe.
- Move the playhead to the start point of the gradient effect. Adjust the "Transition Completion" value to 0%.
- Move the playhead to the end point of the gradient effect. Adjust the "Transition Completion" value to 100%.
- Customize the gradient effect by adjusting the "Gradient" options in the "Effect Controls" panel. You can modify the angle, opacity, colors, and other parameters to achieve the desired look.
- Play the video to preview the gradient effect applied to the highlighted text. Adjust the keyframes and settings as needed to fine-tune the effect.
- Once you are satisfied with the result, save and export your video with the gradient effect applied to the highlighted text.
What is the process of exporting videos with highlighted text from Adobe Premiere?
To export videos with highlighted text from Adobe Premiere, follow the steps below:
- Open your Adobe Premiere project file.
- In the timeline, select the video clip(s) you want to export with highlighted text.
- Go to the "Effects" panel and search for the "Title" or "Text" effect.
- Drag and drop the "Title" or "Text" effect onto the video clip. This will allow you to add text to the selected clip.
- In the "Effect Controls" panel, customize the text settings such as font style, size, color, and position to create the desired highlighting effect.
- Once you have set up the highlighted text effect, go to the "Export" menu by clicking on "File" > "Export" > "Media".
- In the Export Settings window, you can choose the desired format and preset for your exported video. Adjust the settings according to your requirements.
- Specify the export location and filename for your video.
- Finally, click on the "Export" or "Queue" button to begin the export process. Adobe Premiere will render the video with the highlighted text effect based on your customizations.
- Wait for the export process to complete. Once done, you will have a video file with highlighted text ready to be used or shared as needed.
What is the recommended placement of highlighted text in Adobe Premiere?
In Adobe Premiere, the recommended placement of highlighted text is typically at the center or bottom third of the screen. This placement ensures that the text is visible and readable without obstructing the main footage or distracting the viewer. However, the specific placement can vary depending on the style and purpose of the video. Experimentation and considering the overall composition are key to finding the best placement for highlighted text within each specific project.