
Best Green Screen Equipment to Buy in July 2026
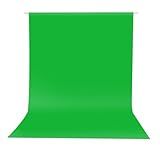
HEMMOTOP Green Screen Backdrop, 5x7 ft Photography Chroma Key Greenscreen Background Sheet for Background Removal, Zoom Meeting, Photo Video Studio, Live Streaming, Video Recording (Backdrop only)
-
SUPERIOR QUALITY MATERIAL: NON-REFLECTIVE POLYESTER ENSURES PERFECT CHROMAKEY.
-
SEAMLESS DESIGN: ONE-PIECE CONSTRUCTION WITH CLEAN EDGES FOR FLAWLESS VISUALS.
-
VERSATILE APPLICATIONS: IDEAL FOR PHOTOSHOOTS, STREAMING, AND VIDEO CONFERENCING.


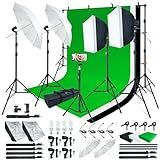
LINCO Lincostore Photo Video Studio Light Kit AM169 - Including 3 Color Backdrops (Black/White/Green) Background Screen
-
ELIMINATE SHADOWS WITH SOFT, DIFFUSED LIGHTING FOR STUNNING PHOTOS.
-
DURABLE, LIGHTWEIGHT STANDS AND BACKGROUNDS FOR SEAMLESS PHOTOGRAPHY.
-
PORTABLE CARRYING BAG ENSURES EASY TRANSPORT OF YOUR PHOTOGRAPHY KIT.

Chromakey Green Screen Gloves Hood Chroma Key Glove and Hood Invisible Effects Background Chroma Keying for Green Screen Photography Photo Video Film Make
- UNISEX GREEN GLOVES AND HOOD FOR STUNNING VISUAL EFFECTS.
- CREATE CAPTIVATING IMAGES WITH CHROMAKEY GREEN GEAR!
- COMFORTABLE, BREATHABLE FABRIC FOR EASY MOVEMENT AND WEAR.

EMART 8.5X10 FT Photography Backdrop Continuous Umbrella Studio Lighting Kit, 6X9 FT Muslin Chromakey Green Screen and Photographic Equipment for Photo Video Shoot
- UPGRADED 6X9 FT COTTON BACKDROP IS SEAMLESS & MACHINE WASHABLE.
- QUICK SETUP WITH CLAMPS PREVENTS BACKDROP SLIPPAGE FOR SMOOTH SHOTS.
- DURABLE LIGHT STANDS WITH ADJUSTABLE HEIGHT & 45W BULBS FOR BRIGHT LIGHTING.
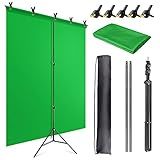
JEBUTU Green Screen Backdrop Kit with Stand, 5X6.5ft Portable Green Screen Backdrop with Stand kit, GreenScreen Background with Stand Carrying Bag Clamp for Streaming Video Zoom
- VERSATILE USE: PERFECT FOR STREAMING, PHOTOGRAPHY, AND INTERVIEWS.
- HIGH-QUALITY, DURABLE MATERIALS: SEAMLESS, WRINKLE-RESISTANT POLYESTER.
- PORTABLE DESIGN: EASY TO STORE WITH ADJUSTABLE T-SHAPE STAND.
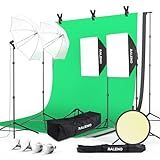
RALENO 8.5 x 10 ft Photo Backdrops Stands with Green Screen, Photography Lighting Kit with 50W LED Bulbs, 5500 K, 97CRI, Umbrellas&Softbox Lighting kit for Studio Equipment Portrait Product Shoot
- VERSATILE PHOTO STUDIO SET FOR ALL SKILL LEVELS: BEGINNERS TO PROS.
- DURABLE LED BULBS OFFER LONG LIFE, LOW ENERGY USE, AND EVEN LIGHTING.
- ADJUSTABLE BACKGROUND SYSTEM FOR FLEXIBLE SETUPS IN ANY SPACE.
Green Screen Backdrop 10x10 ft, Chroma Key Greenscreen Background for Streaming Zoom, Photo Backdrop Curtain for Photography, Thick Polyester Fabric Cloth Sheet for Photoshoot Video (Backdrop Only)
-
ACHIEVE PERFECT CHROMA KEY EFFECTS FOR ENDLESS CREATIVE EDITING.
-
DURABLE, TEAR-RESISTANT EDGES ENSURE A PROFESSIONAL PRESENTATION.
-
LIGHTWEIGHT AND PORTABLE DESIGN, EASY TO CARRY AND SET UP ANYWHERE.
To green screen in Adobe Premiere, follow these steps:
- Import Footage: Start by importing the footage you want to use as the background and the footage you want to use to replace the green screen. Import both into your project.
- Create a New Sequence: Right-click on one of the clips and select "New Sequence from Clip." This will automatically create a sequence with the same settings as your footage.
- Drag and Drop: Drag the background footage onto the timeline first, followed by the green screen footage on top of it. Make sure the green screen footage starts where you want it to appear.
- Add the Ultra Key Effect: Select the green screen footage, go to the Effects panel, and search for "Ultra Key." Drag and drop this effect onto the green screen footage.
- Adjust the Ultra Key Settings: In the Effects Control panel, click on the "Eye Dropper" tool and use it to click on the green screen area in your footage. This will remove the green color. You may need to adjust the settings like Matte Generation, Matte Cleanup, and Transparency to achieve the desired effect.
- Fine-tune the Key: If necessary, use the "Mask" section in the Effects Control panel to refine the edges of the key. This helps in preventing any green spill or unwanted artifacts. You can adjust parameters like Choke, Softness, and Feather based on your footage.
- Composite the Footage: Once you're satisfied with the key, you can further adjust the composite. For example, you can position and scale the green screen footage, add additional effects, or even use multiple layers to create complex composites.
- Export the Final Video: When you're done editing, go to File > Export > Media and choose the desired settings for your final video. Hit "Export" to save the file on your computer.
By following these steps, you can effectively green screen in Adobe Premiere and achieve professional-looking results for your projects.
Can I create a green screen effect in Adobe Premiere without a physical green screen setup?
Yes, it is possible to create a green screen effect in Adobe Premiere without a physical green screen setup using the "Ultra Key" effect. Here's how you can do it:
- Import your footage into Adobe Premiere.
- Drag the footage onto the timeline.
- In the Effects panel, search for the "Ultra Key" effect and apply it to your footage.
- In the Effect Controls panel, click on the eyedropper tool next to the "Key Color" option.
- Click on a section of your footage that should be green (like a grassy area or a green object).
- Adjust the "Matte Generation" settings such as "Pedestal" and "Clip Black" to fine-tune the key effect until the green background is removed.
- If needed, use the "Matte Cleanup" options like "Choke" or "Spill Suppression" to further refine the key effect.
- You can also add a new video layer underneath your footage and add a background or any desired video/image to replace the green screen area.
It's important to note that the quality of the final green screen effect will depend on the lighting conditions and the quality of your original footage. However, with careful adjustments and fine-tuning, you can achieve a decent green screen effect using this method.
How can I properly light a green screen for the best results?
Properly lighting a green screen is crucial to achieve the best results for chroma keying purposes. Here are some tips to help you light a green screen effectively:
- Use bright and even lighting: Ensure that the green screen is evenly lit across its entire surface. Uneven lighting can result in shadowy areas and make it more difficult to extract a clean key later. Soft, diffused lighting can help eliminate shadows and produce a smooth backdrop.
- Separate your subject from the green screen: Position your subject several feet away from the green screen to prevent any unwanted spill or color contamination. Ideally, the green screen should be evenly lit separately from the subject.
- Position your lighting sources properly: Place your lighting sources at a 45-degree angle to the green screen. This helps eliminate any potential shadows or hotspots. Consider using three-point lighting with key, fill, and backlights to ensure proper illumination on your subject while avoiding spill onto the green screen.
- Avoid lighting your subject with the same lights used for the green screen: Separate your subject lighting from the green screen lighting to minimize any chance of green spill on your talent. Otherwise, the green screen may reflect onto your subject, making keying more difficult.
- Ensure sufficient distance between the subject and green screen: Maintaining a safe distance helps minimize the spill of green light onto your subject and allows for easier separation of the subject from the background.
- Test and adjust lighting settings: Before shooting, perform test shots with your subject and green screen under the desired lighting conditions. Adjust the positioning and intensity of your lights as needed to achieve an even, well-lit green screen with minimal shadows.
- Check for color consistency: Use a color chart or a separate reference object to ensure the green screen appears consistently in the desired shade of green. This helps maintain continuity and makes keying more accurate.
Remember, lighting techniques may vary depending on the specific setup, equipment, and shooting conditions, so experimentation and testing are essential to achieve the best results.
How can I make my subject interact with the virtual background in a convincing way?
To make your subject interact with a virtual background in a convincing way, you can follow these steps:
- Lighting: Ensure that the lighting on your subject matches the virtual background. Pay attention to the direction of light, intensity, and shadows. This will make the subject look like it belongs within the virtual environment. Adjust your lighting setup accordingly.
- Depth of Field: Use a shallow depth of field to separate the subject from the background. This can be achieved by using a wide aperture on your camera or by using a software blur effect during post-processing.
- Subject Positioning: Direct your subject to stand or sit at an appropriate distance from the virtual background. Make sure they are not too close or too far away, as this can make the interaction seem unnatural.
- Eye Focus: Instruct your subject to look at the virtual background or an object within it. Align their gaze with the virtual elements to create a more convincing interaction.
- Real-world Interaction: Encourage your subject to physically interact with objects that might be present in the virtual background. For example, they can pretend to hold an object or push against a virtual wall. This will make their movements seem more genuine.
- Matching Movement: Carefully observe the elements and movement within the virtual background. Direct your subject to mimic or react to virtual objects whenever possible. This will create a sense of connection with the environment.
- Green Screen Quality: Ensure that your green screen (if used) is properly lit, evenly colored, and without any wrinkles or shadows. This will help the software accurately key out the background and composite the virtual environment.
- Fine-tuning during Post-processing: After filming, take your footage to a video-editing software with proper chroma key capabilities. Carefully adjust settings like keying, color correction, and saturation to seamlessly blend the subject with the virtual background. Pay attention to details like edges, shadows, and reflections.
By following these guidelines, you can enhance the interaction between your subject and the virtual background, making it appear more convincing and immersive.
Can I achieve the same green screen effects in Adobe Premiere Elements or other video editing software?
Yes, you can achieve green screen effects in Adobe Premiere Elements or other video editing software like Adobe Premiere Pro, Final Cut Pro, iMovie, and many more. While the specific steps may vary slightly between different software, the general process of using green screens remains the same.
Here's a general overview of the steps to achieve green screen effects in video editing software:
- Import your footage: Import the video with the green screen background and the video or image you want to replace it with into your editing software.
- Arrange the tracks: Place the green screen footage on one track and the replacement footage on a higher track.
- Apply the chroma key effect: Locate and apply the chroma key or green screen effect in your software's effects panel. Adjust the settings to suit your footage, typically by selecting the color range you want to key out (usually green or blue), adjusting the tolerance, and fine-tuning other options like spill suppression and edge smoothing.
- Adjust the replacement footage: Resize and position the replacement footage to align with the desired area on the green screen.
- Refine the keying: Fine-tune the chroma key effect if needed, by adjusting the settings and experimenting with options for better edge blending or eliminating any residual green spill.
- Add additional effects and adjustments: Customize your video further by adding effects, transitions, color grading, or any other enhancements you desire.
- Export the final video: Once you are satisfied with your edits, export the video in your desired format and settings.
While these steps provide a general guideline, the process may vary slightly depending on the software you are using. It is recommended to consult the software's documentation or online tutorials for specific instructions on achieving green screen effects.
How do I import my green screen footage into Adobe Premiere?
To import your green screen footage into Adobe Premiere, follow these steps:
- Open Adobe Premiere Pro and create a new project.
- In the project panel, click on the "Import" button or use the shortcut "Ctrl+I" (Windows) or "Cmd+I" (Mac).
- Browse and locate the folder or file containing your green screen footage.
- Select the file and click on the "Import" button.
Once the footage is imported, you can drag and drop it into the timeline for editing.
What are some popular movies or TV shows that utilize green screen technology in post-production?
There are numerous movies and TV shows that utilize green screen technology in post-production. Here are some popular examples:
- "Avatar" (2009) - This groundbreaking film by James Cameron extensively used green screen technology in creating the lush world of Pandora.
- "Game of Thrones" (2011-2019) - The famous fantasy TV series involved the use of green screen for creating the grandiose sets, expansive landscapes, and thrilling battle sequences.
- "The Matrix" trilogy (1999-2003) - These action-packed films used green screens extensively to create the iconic "bullet time" and other visually stunning scenes.
- "The Lord of the Rings" trilogy (2001-2003) - These epic fantasy films used green screen technology to bring the vast landscapes of Middle-earth to life.
- "Iron Man" (2008) - This superhero film utilized green screens extensively to create the advanced technology and high-tech environments.
- "The Mandalorian" (2019-present) - This widely acclaimed Star Wars TV series heavily relies on green screen technology to create the immersive and visually stunning worlds of the Star Wars universe.
- "Harry Potter" series (2001-2011) - The magical world of Harry Potter heavily depended on green screen technology for creating magical creatures, enchanting locations, and thrilling action scenes.
- "Guardians of the Galaxy" (2014) - This Marvel superhero movie employed green screen technology extensively to craft the cosmic landscapes and vibrant visual effects.
- "The Avengers" series - The blockbuster Marvel movies, including "The Avengers" (2012), "Age of Ultron" (2015), "Infinity War" (2018), and "Endgame" (2019) utilized green screen technology in creating the epic battles and fantastical environments.
- "The Great Gatsby" (2013) - This visually stunning film used green screen technology to recreate the opulent world of the 1920s.
These are just a few examples, as green screen technology has become a standard tool in the film and TV industry for creating visually captivating and immersive scenes.
Are there any tips for finding high-quality background images or videos for green screen projects?
Yes, there are several tips for finding high-quality background images or videos for green screen projects:
- Look for sites offering royalty-free content: Websites like Pixabay, Pexels, and Unsplash offer a wide range of high-quality, free stock images and videos.
- Check out specialized stock footage platforms: Websites such as Shutterstock, Adobe Stock, and Getty Images provide premium stock images and videos for a fee. These platforms offer a wide selection of high-quality content that suits various green screen projects.
- Consider the image or video resolution: Ensure that the resolution is suitable for your project. Higher resolutions provide better quality, particularly for professional or large-scale productions.
- Look for clean and well-lit visuals: Choose images or videos with clear backgrounds and sufficient lighting. This helps create a seamless and realistic blend between the foreground and background when you overlay your green screen footage.
- Consider the file format and transparency: Look for images and videos in formats that support transparency, such as PNG or MOV with an alpha channel. These formats allow you to easily remove the green screen background and replace it.
- Search for keywords related to your project: Use relevant keywords while searching for backgrounds. For example, if you're looking for a beach background, try using keywords like "beach," "ocean," or "tropical."
- Preview and test the content: Whenever possible, preview the background images or videos before downloading or purchasing them. Assess how they appear with your green screen footage to ensure they align well and meet your project requirements.
By following these tips, you can locate high-quality background images or videos to enhance your green screen projects.
Are there any plugins or third-party tools that can enhance the green screen workflow in Adobe Premiere?
Yes, there are several plugins and third-party tools that can enhance the green screen workflow in Adobe Premiere Pro. Some popular ones include:
- Keylight: Keylight is a popular keying plugin that comes with Adobe After Effects, but it can also be used in Premiere Pro. It offers advanced keying features and controls for a more refined green screen key.
- Primatte Keyer: Primatte Keyer is a dedicated keying plugin by Red Giant. It provides highly automatic and precise chroma keying tools for seamless green screen compositing.
- Ultra Key: Ultra Key is a built-in keying effect in Adobe Premiere Pro. It offers advanced keying controls like matte cleanup, spill suppression, and edge color adaptiveness for a better keying workflow.
- NewBlue Chroma Key Pro: NewBlue Chroma Key Pro is a comprehensive keying plugin that offers advanced color keying, matte clean-up, and spill suppression tools. It comes with a range of presets and customizable parameters for better control.
- Boris FX: Boris FX offers a suite of plugins for advanced keying and compositing in Premiere Pro. Popular Boris FX plugins like Continuum and Sapphire provide powerful keying tools and real-time previews for efficient green screen workflows.
These plugins and tools can significantly enhance the green screen workflow by providing advanced keying controls, automatic cleanup options, and seamless compositing features in Adobe Premiere Pro.
Can I use multiple green screens in a single project? If yes, how can I manage them effectively?
Yes, you can use multiple green screens in a single project. Managing them effectively involves a few key steps:
- Positioning: Arrange the green screens in a way that provides enough space for the subjects or objects to be properly placed in front of each screen. Pay attention to lighting conditions to ensure consistent color and avoid shadows.
- Lighting: Maintain consistent lighting across all green screens to avoid discrepancies. This is crucial for achieving a seamless compositing effect later. Consider using multiple lights or reflectors to evenly illuminate each screen.
- Camera setup: Set up your camera to capture each green screen separately, allowing you to isolate and replace the backgrounds later. Use markers or reference points to ensure alignment between the screens and maintain consistent framing.
- Chroma key software: Choose a video editing or compositing software that supports multiple green screen removals simultaneously. This will allow you to work with each screen individually and replace the backgrounds accordingly.
- Layering and compositing: Import your footage into the software and use the chroma key feature to remove the green screens. Expertly layer the resulting footage onto the desired backgrounds, ensuring proper alignment and blending for a cohesive final output.
- Fine-tuning: Pay attention to details like edge softness, color correction, and lighting adjustments to make the composite look seamless. Use masking or rotoscoping techniques if necessary to refine the composition.
By following these steps, you can effectively manage and use multiple green screens in a single project, allowing for versatile and creative visual effects.