
Best Tools and Accessories to Buy for Adobe Premiere Pro Performance in July 2026
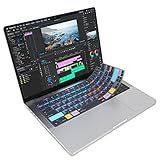
JCPal Adobe Premiere Pro Shortcut Guide Keyboard Cover for Apple MacBook Pro 14 inch (M1-M5) and MacBook Pro 16 inch (M1-M4) and MacBook Air 13 inch and MacBook Air 15 inch (M2-M4) (US-Layout)
- MASTER ADOBE PREMIERE PRO WITH 90+ ESSENTIAL SHORTCUTS!
- PROTECTS YOUR MACBOOK WHILE ENHANCING YOUR EDITING SKILLS!
- PRECISION FIT FOR LATEST MACBOOK MODELS; WASHABLE SILICONE DESIGN!


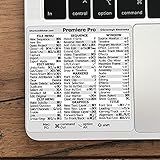
Synerlogic for Adobe Premiere Pro Quick Reference Keyboard Shortcut Sticker for Any MacBook or Windows PC
- MASTER SHORTCUTS QUICKLY-NEVER GOOGLE COMMANDS AGAIN!
- BOOST PRODUCTIVITY FOR ALL SKILL LEVELS, FROM NEWBIES TO PROS!
- DURABLE, PROFESSIONAL QUALITY GUARANTEED FOR LONG-LASTING USE.
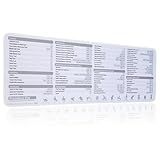
Premiere Pro Shortcuts Mousepad, Adobe Premiere Keyboard Mouse Pad, Quick Reference Keyboard Shortcut Desk Mat for Video Eidting,Large Size,Waterproof, Non-Slip, Gifts for Friend
- BOOST EFFICIENCY: CHEAT SHEET SHORTCUTS STREAMLINE VIDEO EDITING TASKS.
- VIBRANT DESIGN: HD PRINTING ENSURES CLEAR COMMANDS AND BRIGHT COLORS.
- SPILL-RESISTANT: WATERPROOF SURFACE MAKES CLEANUP QUICK AND EASY.
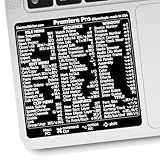
Synerlogic for Adobe Premiere Pro Quick Reference Keyboard Shortcut Sticker for Any MacBook or Windows PC (Black)
- UNLOCK EFFICIENCY: MASTER SHORTCUTS AND BOOST WORKFLOW INSTANTLY!
- DURABLE DESIGN: MILITARY-GRADE VINYL FOR LONG-LASTING, STYLISH USE.
- ALL SKILL LEVELS: PERFECT FOR BEGINNERS TO PROS-LEARN AT ANY AGE!

Synerlogic (2pcs) for Adobe Premiere Pro Quick Reference Keyboard Shortcut Sticker for Any MacBook or Windows PC
- MASTER SHORTCUTS INSTANTLY: ESSENTIAL COMMANDS AT YOUR FINGERTIPS!
- BOOST PRODUCTIVITY: WORK FASTER WITH QUICK TIPS FOR ALL SKILL LEVELS.
- DURABLE QUALITY: MILITARY-GRADE VINYL ENSURES LONG-LASTING PERFORMANCE.

Synerlogic (10pcs) for Adobe Premiere Pro Quick Reference Keyboard Shortcut Sticker for Any MacBook or Windows PC
- MASTER SHORTCUTS INSTANTLY WITH OUR ESSENTIAL KEYBOARD STICKER.
- BOOST PRODUCTIVITY-WORK FASTER AND SMARTER, FOR ALL SKILL LEVELS.
- DURABLE, PROFESSIONAL DESIGN WITH A QUALITY GUARANTEE INCLUDED!
JCPAL Adobe Premiere Pro Keyboard • Dash Wireless Shortcut Keyboard for Mac and PC • Shortcut Hotkeys, Color-Coded Key Guide, Fully Customizable, Compact Low-Profile Design
- BOOST PRODUCTIVITY WITH PREPROGRAMMED SHORTCUTS FOR RAPID EDITING.
- FULLY CUSTOMIZABLE KEYS TO FIT YOUR UNIQUE CREATIVE WORKFLOW.
- MULTI-DEVICE CONNECTIVITY FOR SEAMLESS SWITCHING BETWEEN PLATFORMS.
Lag in Adobe Premiere Pro can be frustrating while working on projects. However, there are a few ways to fix this issue. Here are some text-based solutions without list items:
- Lower the playback resolution: Premiere Pro allows you to adjust the playback resolution. By reducing it to a lower value, such as 1/2 or 1/4, the program will require fewer resources to play the footage smoothly.
- Adjust the playback quality: Click on the wrench icon in the Program Monitor and select "Playback Settings." Change the "Playback Quality" from "Full" to "Automatic" or "Draft" to reduce the strain on your system.
- Render and replace complex effects: If you have many complex effects applied to your footage, you can choose to render and replace them. Right-click on the clip, select "Render and Replace," and choose an appropriate output format and codec. This will pre-render the effect and make playback smoother.
- Optimize your computer: Ensure that your computer is running efficiently by closing unnecessary background applications, freeing up disk space, and updating your graphics drivers. A faster and more capable system will improve overall performance.
- Use a proxy workflow: A proxy workflow involves creating lower-resolution copies, or proxies, of your footage for editing. This allows you to edit smoothly with smaller files and then link back to the original high-resolution files for export. Premiere Pro offers built-in tools for proxy creation.
- Adjust sequence settings: Check if your sequence settings match the properties of your footage. Misaligned settings may cause lag. Right-click on your sequence in the Project panel, choose "Sequence Settings," and confirm that resolution, frame rate, and other parameters match your footage.
- Clear media cache files: Over time, Premiere Pro creates temporary cache files to speed up media playback. However, these files can accumulate and eventually slow down the program. Go to "Preferences" > "Media" and click on "Clean" to delete cache files.
- Enable GPU acceleration: Premiere Pro can utilize the processing power of your graphics card (GPU) to enhance performance. In the "Preferences" > "Playback" menu, ensure that "Enable Mercury Playback Engine GPU Acceleration" is selected.
By implementing these solutions, you can reduce lag and ensure a smoother editing experience in Adobe Premiere Pro.
What is the recommended method to organize media files within Adobe Premiere Pro to avoid lag?
To organize media files within Adobe Premiere Pro and avoid lag, follow these recommended methods:
- Create a folder structure: Organize your media files into separate folders based on type, such as video clips, audio files, images, etc. This helps in keeping everything organized and easily accessible.
- Use a dedicated hard drive: It is recommended to store your project files and media on a separate hard drive from your system drive. A dedicated drive, preferably an SSD, can provide faster data transfer speeds and reduce lagging issues.
- Proxy workflow: Premiere Pro offers a Proxy workflow feature. Create lower-resolution proxy files for editing and link them to your project. This allows you to work with lightweight files during editing, reducing the strain on your system and reducing lag. You can switch back to the original high-resolution files during the final export.
- Transcode your footage: If your original footage is in a format that is not optimized for editing, it is advisable to transcode it to a more editing-friendly format. Codecs like ProRes, DNxHD, or Cineform are examples of formats that work well within Premiere Pro, providing smoother playback and reducing lag.
- Trim and clean up the timeline: Remove any unnecessary clips or empty spaces from your timeline. This reduces the processing load on your system and helps improve playback performance.
- Render previews: Adobe Premiere Pro allows you to render and create preview files for your timeline. This can be done selectively on certain sections or the entire timeline, depending on your requirement. Rendered previews help in smoother playback and real-time editing.
- Update graphics drivers: Make sure your graphics drivers are up to date. This is especially important if you experience lag while working with effects, transitions, or other visual elements within Premiere Pro.
- Clear cache and media cache databases: Regularly clear your Premiere Pro cache and media cache databases to avoid any clutter that might cause lag. Go to "Edit" > "Preferences" > "Media Cache" and click on "Clean" to clear the cache.
By following these recommended methods, you can effectively organize your media files and optimize Adobe Premiere Pro for smoother editing, reducing lag and improving performance.
How to allocate more memory to Adobe Premiere Pro to reduce lag?
To allocate more memory to Adobe Premiere Pro and reduce lag, you can follow these steps:
- Close all unnecessary applications and processes running in the background to free up system resources.
- Open Adobe Premiere Pro and go to the "Edit" menu on Windows or the "Premiere Pro" menu on macOS.
- Select "Preferences" and click on "Memory."
- In the "RAM reserved for other applications" section, adjust the slider to allocate more memory to Adobe Premiere Pro. It is recommended to allocate around 60-70% of your available RAM to Premiere Pro.
- Click on "OK" to save the changes and restart Adobe Premiere Pro.
Additionally, you can also try the following tips to further reduce lag:
- Update Adobe Premiere Pro to the latest version, as newer versions often come with performance improvements and bug fixes.
- Disable GPU acceleration or switch to software-only rendering if you are facing issues with the graphics card.
- Split large video files into smaller chunks and work on them separately to avoid overloading the program.
- Clear cache files regularly by going to "Preferences" > "Media" and clicking on "Clean" under the "Media Cache Database" section.
- Use optimized media or lower-resolution proxies for editing, especially if you are working with high-resolution footage.
- Make sure your computer meets the minimum system requirements for Adobe Premiere Pro, including sufficient RAM, a powerful processor, and a dedicated graphics card.
- Consider upgrading your hardware, such as increasing the RAM or using faster storage solutions like SSDs, to improve overall performance.
By implementing these steps, you should be able to allocate more memory to Adobe Premiere Pro and reduce lag while working on your video projects.
How to create proxy files for smoother playback in Adobe Premiere Pro?
To create proxy files for smoother playback in Adobe Premiere Pro, follow these steps:
- Import your original video files into Adobe Premiere Pro.
- Right-click on the video in the Project panel, navigate to Proxy > Create Proxies.
- In the Create Proxies window, select the format of the proxy file. Adobe Premiere Pro supports a variety of formats like ProRes, DNxHR, and H.264.
- Choose the desired resolution for the proxy files. It's recommended to select a lower resolution than the original video to reduce file size and improve performance. For example, if your original video is 4K, you can choose 1080p or 720p as the resolution for the proxy files.
- Select the location where you want to save the proxy files. It's advisable to save them in a separate folder for organization.
- After selecting the format, resolution, and destination folder, click on the OK button to create the proxy files. Premiere Pro will generate the proxy files in the background.
- Once the proxy files are created, Premiere Pro will automatically link the proxies to the original video files.
- To switch to the proxy files for smoother playback, go to the Program Monitor and click on the wrench icon. In the drop-down menu, select Proxy > Use Proxies.
- Premiere Pro will now use the proxy files for editing and playback. You can work with the proxy files to improve performance, and the changes will be automatically applied to the original files.
- If you want to switch back to the original files, follow the same steps and select Proxy > Use Original.
By creating and using proxy files, you can achieve smoother playback in Adobe Premiere Pro, especially for high-resolution videos or if your computer lacks sufficient hardware resources.
How to optimize the scratch disk settings in Adobe Premiere Pro?
To optimize the scratch disk settings in Adobe Premiere Pro, follow these steps:
- Open Adobe Premiere Pro and go to Edit > Preferences > Scratch Disks.
- In the Scratch Disks preferences window, you will see different options for setting the scratch disk locations.
- First, select a location for the "Media Cache" files. These are temporary files that Premiere Pro creates during the editing process. It is recommended to choose a fast and separate hard drive for this option.
- Next, choose a location for the "Media Cache Database" files. These are used to store information about the media cache files. Again, it is advised to select a separate and fast drive for this option.
- Select a location for "Captured Video" if you plan on capturing video directly into Premiere Pro. If not, you can leave this option unchecked.
- Finally, choose a location for "Preview Files". This is where Premiere Pro stores rendered previews of your timeline. It is recommended to select a fast and separate drive for this option as well, especially if you are working with high-resolution footage.
- Once you have selected the appropriate locations for your scratch disks, click "OK" to save the settings.
By optimizing the scratch disk settings, you can improve the performance of Adobe Premiere Pro and ensure smooth video editing experience.
What is GPU acceleration in Adobe Premiere Pro?
GPU acceleration in Adobe Premiere Pro is the utilization of a computer's graphics processing unit (GPU) to enhance the performance and speed of video editing tasks within the software. By offloading certain processing tasks from the central processing unit (CPU) to the GPU, Premiere Pro can achieve faster rendering, smoother playback, and real-time effects previews. This is particularly beneficial for tasks like applying video effects, adding color grading, and working with high-resolution videos. GPU acceleration can be enabled in Premiere Pro by selecting the appropriate GPU option in the software's settings.