
Best Tools to Buy for Drawing Lines in Adobe Premiere Pro in July 2026
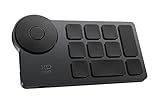
XPPen Mini Keydial ACK05 Wireless Shortcut Keyboard Bluetooth Programmable Express Remote Control with Dial & Customized Express Keys for Drawing Tablet PC MacBook Windows Images Video Editing
-
VERSATILE CONNECTION OPTIONS: CONNECT VIA BLUETOOTH, DONGLE, OR USB.
-
CUSTOM SHORTCUTS FOR EFFICIENCY: CUSTOMIZE UP TO 40 SHORTCUTS EASILY.
-
ERGONOMIC DESIGN FOR COMFORT: PERFECT FOR BOTH LEFT AND RIGHT-HANDED USERS.


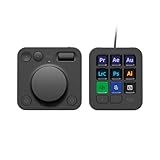
Logitech MX Creative Console, 9 Customizable LCD Keys, Stream Deck Accessories, Control Dial for Graphic Design, Adobe, Zoom, Spotify - Graphite, 3-Month Adobe Creative Cloud Membership
- ACCELERATE CREATIVITY WITH QUICK ACCESS TO ESSENTIAL APP TOOLS.
- FULLY CUSTOMIZE 15 KEYPAD PAGES WITH ICONS FOR ANY APP.
- ENJOY 3 MONTHS OF ADOBE CREATIVE CLOUD WITH YOUR PURCHASE!
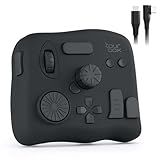
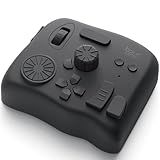
TourBox NEO - Customizable Editing Controller, Photo Color Grading Illustration Speed Editor, Intuitive Control Boost Productivity, Programmable Keyboard for Adobe CSP and More, Works with Mac/PC
- ZERO-LATENCY WIRED DESIGN ENSURES STABLE AND SEAMLESS CREATIVE WORKFLOW.
- EXTENSIVE SOFTWARE SUPPORT ENHANCES EFFICIENCY FOR ALL CREATIVE PROJECTS.
- INTUITIVE CONTROLS STREAMLINE PHOTO EDITING AND VIDEO COLOR GRADING TASKS.
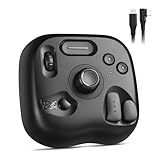
TourBox Lite - Editing Keyboard Compact, Artists Go-to Drawing Macro Keypad, Works with Clip Studio Paint & More, Creative Controller with Custom Software, Streamline All Workflows - Wired (Unit Only)
-
INTUITIVE CONTROL: MASTER 200+ FUNCTIONS WITH 8 CUSTOMIZABLE BUTTONS!
-
EASY SETUP: 98% OF USERS MASTER CORE FUNCTIONS IN JUST 7 DAYS!
-
ERGONOMIC DESIGN: NATURAL GRIP REDUCES STRAIN FOR LONG CREATIVE SESSIONS.
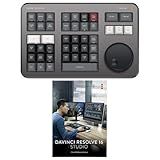
Blackmagic Design Davinci Resolve Speed Editor Bundle with Davinci Resolve 18 Studio (Activation Card)
- COMPACT DESIGN WITH BUILT-IN BATTERY FOR ON-THE-GO USE.
- EFFORTLESS NAVIGATION WITH BUILT-IN SEARCH DIAL.
- INCLUDES DAVINCI RESOLVE 17 STUDIO FOR ENHANCED EDITING POWER!
TourBox Elite - Bluetooth Video Editing Controller Color Grading Speed Editor, Intuitive Control, Professional Digital Creator Console for Davinci, Premiere, Final Cut Pro and More, Mac/PC (Black)
- DUAL CONNECTIVITY: BLUETOOTH & USB-C FOR SEAMLESS PERFORMANCE.
- EXTENSIVE SOFTWARE SUPPORT: WORKS WITH ALL MAJOR CREATIVE APPLICATIONS.
- FULLY CUSTOMIZABLE: TAILOR CONTROLS TO YOUR UNIQUE WORKFLOW NEEDS.
To draw lines in Adobe Premiere Pro, you can follow these steps:
- Open Adobe Premiere Pro on your computer and create a new project.
- Import the video clip or still image to which you want to add a line.
- Drag and drop the footage onto the timeline.
- Locate the "Effect Controls" panel on the left side of the screen.
- Click on the "+" icon next to "Video Effects" to expand the menu.
- Scroll down and find the "Generate" folder.
- Click on the triangle icon to expand the folder.
- Look for the "Basic 3D" effect and drag it onto your video clip in the timeline.
- In the "Effect Controls" panel, adjust the settings of the "Basic 3D" effect to your preference.
- To draw the line, go to the "Graphics" workspace by selecting it from the top toolbar.
- Under the "Graphics" workspace, select the "Ellipse" or "Rectangle" tool from the toolbar on the right-hand side.
- Click and drag on your video footage in the Program Monitor to create a shape.
- In the "Essential Graphics" panel, adjust the fill and stroke color, size, and other properties of the shape.
- To convert the shape into a line, select the shape on the timeline and go to the "Effect Controls" panel.
- Under the "Shape" options, locate the "Path" menu.
- Click on the stopwatch icon next to "Path" to enable keyframing.
- Move the playhead in the timeline to where you want the line to start, then click on the "Add keyframe" icon next to the "Path" property.
- Move the playhead to where you want the line to end, then adjust the shape of the line by dragging its control points in the Program Monitor.
- Premiere Pro will automatically create the necessary keyframes between the start and end points to animate the line.
- You can further refine and customize the line's appearance and animation by using other effects, tools, and properties in Premiere Pro.
That's it! By following these steps, you can draw lines in Adobe Premiere Pro and add creative elements to your videos.
What is the function of the line tool in Adobe Premiere Pro?
The line tool in Adobe Premiere Pro is used to draw straight lines or shape layers on the program's timeline. This tool is primarily used for creating motion paths or for masking specific parts of a video or image. It can be useful for adding simple animations or effects to a video and is often used in combination with keyframes to create complex movements or shapes over time.
How to create a zigzag line in Adobe Premiere Pro?
To create a zigzag line in Adobe Premiere Pro, you can use the shape tool and keyframe animations. Follow these steps:
- Open Adobe Premiere Pro and create a new project.
- Import the footage or background on which you want to create the zigzag line.
- Right-click on the Project panel and select "New Item" -> "Title" to create a new title.
- In the Title panel, click on the "Shapes" tab on the top left corner.
- Select the "Rectangle" shape tool, or any other shape tool you prefer.
- Draw a rectangle shape on the title window. Hold the Shift key while dragging a shape to keep it proportionate.
- With the shape selected, go to the "Essential Graphics" panel on the right side of the screen.
- Under "Appearance", change the stroke color to the desired color for your zigzag line. You can also adjust the stroke width if necessary.
- Under "Controls", click on the stopwatch icon next to "Stroke Width" to enable keyframes.
- Move the playhead to the time where you want the zigzag line to start.
- Click on the "Motion" tab on the top left corner of the Title panel.
- Click on the stopwatch icon next to "Position" to enable keyframes.
- Move the playhead to the time where you want the zigzag line to end.
- Click and drag the shape on the title window to create a zigzag pattern.
- Now, you can play the footage to see the animated zigzag line.
Remember to save your project regularly and export it to your desired format when you are satisfied with the results.
How to draw curved lines in Adobe Premiere Pro?
To draw curved lines in Adobe Premiere Pro, you can use the Pen Tool. Here's how:
- Open Adobe Premiere Pro and create a new project or open an existing one.
- Navigate to the timeline where you want to draw the curved line.
- Select the Pen Tool from the toolbar. It looks like a pen tip.
- Click on the point where you want the curved line to start. This will create the first anchor point.
- Move your cursor to the next point where you want the curve to bend.
- Click and drag to create handlebars. These handlebars determine the direction and length of the curve.
- Release the mouse button to create the second anchor point and complete the curve.
- To further adjust the curve, you can click and drag the handlebars or the anchor points.
- Continue adding more anchor points and adjusting the curve as needed.
- To create a smooth curve, position your anchor points and handlebars properly.
- Once you're satisfied with the curved line, you can adjust its properties in the Effect Controls panel, such as opacity, color, stroke width, etc.
- You can also animate the curved line by keyframing the properties over time.
Note: Drawing curved lines in Adobe Premiere Pro may be limited compared to dedicated vector-based software like Adobe Illustrator. If you need more precise control over curves, it may be better to create them in Illustrator and import them into Premiere Pro.
What is the difference between drawing a line and creating a shape in Adobe Premiere Pro?
Drawing a line and creating a shape in Adobe Premiere Pro are two different methods of creating visual elements in a video project.
- Drawing a Line: Drawing a line in Adobe Premiere Pro refers to using the Pen tool or the Line tool to manually create a line on the video footage or within a title.
- When drawing a line, the user has more control over the shape, length, and position as they can drag and manipulate anchor points, curves, and handles to create a custom line.
- Drawing a line is a bit more precise and versatile, making it suitable for creating specific shapes or designs that are not predefined.
- Creating a Shape: Creating a shape in Adobe Premiere Pro refers to using the Shape tools to add predefined shapes such as rectangle, ellipse, triangle, or polygon to the video canvas or within a title.
- Creating a shape involves selecting a shape tool, clicking and dragging on the video canvas to create the shape, and then applying properties like stroke color, fill color, or opacity to customize the shape.
- Shapes are quick and easy to create as they do not require manual designing like drawing a line. They are primarily useful for adding simple graphical elements or graphics overlays in a video.
In summary, drawing a line offers more manual control and versatility, while creating a shape provides predefined shapes for quick and easy customization. The choice between the two methods largely depends on the desired visual outcome and complexity of the design needed.
What is the shortcut key to create a new line in Adobe Premiere Pro?
The shortcut key to create a new line in Adobe Premiere Pro is "Shift + Enter" on Windows or "Shift + Return" on macOS.
How to draw a freehand line in Adobe Premiere Pro?
To draw a freehand line in Adobe Premiere Pro, follow these steps:
- Open Adobe Premiere Pro and create a new project or open an existing project.
- Go to the "Graphics" workspace by clicking on the "Graphics" tab at the top of the screen.
- In the "Graphics" workspace, click on the "Essential Graphics" panel. If it is not visible, go to "Window" and select "Essential Graphics" to open the panel.
- In the "Essential Graphics" panel, click on the "Shapes" tab.
- Click on the "Rectangle" tool in the "Shapes" tab. This will open a dropdown menu with different shape options.
- Select the "Pen" tool from the dropdown menu. The cursor will change to a pen icon.
- Position the pen cursor where you want to start the freehand line and click to set the first point.
- Move the pen cursor while holding down the mouse button to draw the freehand line. Adobe Premiere Pro will automatically smooth out the line as you draw.
- When you reach the end point of the line, release the mouse button to complete the freehand line.
- To customize the appearance of the freehand line, you can adjust its color, thickness, opacity, and other properties in the "Graphics" workspace.
- Once you are satisfied with the freehand line, you can position it on the video timeline to overlay it on your footage.
- To animate the freehand line, you can use keyframes or other Premiere Pro animation tools.
Note: Adobe Premiere Pro is primarily a video editing software, so its capability to draw freehand lines is limited compared to dedicated graphic design software like Adobe Illustrator or Adobe Photoshop. If you need more advanced drawing capabilities, consider using those applications instead.
What is the line alignment option in Adobe Premiere Pro?
The line alignment option in Adobe Premiere Pro allows you to adjust the vertical alignment of text or graphics in a video project. It is useful when you want to position text or graphics in a specific location relative to other elements in the video. The available line alignment options in Premiere Pro include top, center, and bottom alignment. By choosing the desired alignment option, you can ensure that your text or graphics are positioned exactly where you want them within the video frame.
What is the line opacity keyframe function in Adobe Premiere Pro?
The line opacity keyframe function in Adobe Premiere Pro allows you to adjust the opacity of a video clip or graphic overlay over time. By setting keyframes, you can create a gradual or abrupt change in the opacity level, controlling when an element becomes more or less transparent. This can be used for various effects, such as fading in or out, creating a ghost-like appearance, or revealing hidden elements.
How to convert a line to a shape in Adobe Premiere Pro?
To convert a line to a shape in Adobe Premiere Pro, you can follow these steps:
- Open your Premiere Pro project and import the video clip or image you want to work with.
- Create a new Shape layer by selecting the "Rectangle" or "Ellipse" tool from the toolbar in the Project panel.
- Click and drag on the Program Monitor to draw a shape with the desired dimensions and position. You can hold the Shift key while dragging to maintain proportions or the Ctrl key (Command key on Mac) to scale from the center.
- With the shape selected, go to the "Effects Controls" panel and adjust the fill color, stroke color, stroke width, and other properties to customize the appearance of the shape.
- Next, select the shape layer in the Timeline panel and copy it by pressing Ctrl+C (Command+C on Mac).
- Select the video clip or image layer in the Timeline panel and place the playhead at the desired position. Then, paste the shape layer by pressing Ctrl+V (Command+V on Mac).
- The shape will now appear as an image overlay on top of the video or image. You can resize, reposition, and adjust the duration of the shape layer as needed by dragging its edges in the Timeline panel.
By following these steps, you can easily convert a line into a shape in Adobe Premiere Pro and incorporate it into your video project.