
Best Hydration Pack Accessories to Buy in July 2026
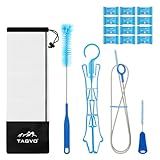
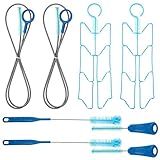
TAGVO Hydration Bladder Cleaning Kit, 6 in 1 Water Bladder Cleaner Set - 3 Brushes, Collapsible Hanger, 12 Cleaning Tablets & Carry Pouch, Water Reservoir Backpack Cleaning Tools
- ALL-IN-ONE KIT CLEANS 2/3L BLADDERS FOR ULTIMATE HYDRATION HYGIENE!
- SOFT BRISTLE BRUSHES ENSURE EFFECTIVE CLEANING WITHOUT SCRATCHING.
- IDEAL GIFT FOR OUTDOOR ENTHUSIASTS TO MAINTAIN HYDRATION GEAR!


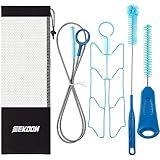
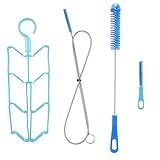
4 Pcs Set Reservoirs Backpack Accessories Hydration Bladder Cleaning Kit with Flexible Long Brush for Hose, Small Bite Valve and Big Brush, Drying Collapsible Bladder Frame, Carrying Pouch (Blue)
-
COMPREHENSIVE 5-IN-1 KIT FOR ALL HYDRATION CLEANING NEEDS.
-
SAFE, DURABLE MATERIALS ENSURE EFFECTIVE, DAMAGE-FREE CLEANING.
-
VERSATILE BRUSHES DESIGNED FOR PRECISE CLEANING IN TIGHT SPACES.
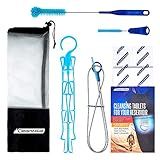
Reservoir Hydration Bladder Cleaning Kit - 6-In-1 Water Reservoir Cleaning Kit Of 3 Brushes, Collapsible Frame, (12) Cleansing Tablets & Carry Pouch - Cleaner Set For Back Pack Bladder
-
COMPLETE CLEANING KIT FOR HYDRATION BLADDERS-ALL YOU NEED!
-
DURABLE BRUSHES & FRAME ENSURE LONG-LASTING CLEANLINESS!
-
PERFECT GIFT FOR OUTDOOR ENTHUSIASTS-KEEP THEM HYDRATED!
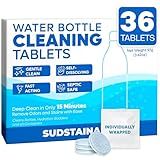
Sudstainables Water Bottle Cleaning Tablets – 36-Pack | Chlorine-Free & Odor-Control Formula | Water Bottle Cleaner, Flasks, Hydration Packs & Travel Mugs | Washer Tablets for Home, Hiking & Camping
- FAST-ACTING TABLETS REMOVE STAINS, ODORS, AND BUILDUP IN MINUTES.
- VERSATILE FOR BOTTLES, TUMBLERS, MUGS, AND HYDRATION PACKS.
- COMPACT AND PORTABLE-PERFECT FOR HOME, CAMPING, AND OUTDOOR ADVENTURES.
Patelai 2 Set 8 in 1 Hydration Bladder Cleaning Kit Includes 3 Different Brushes and Drying Collapsible Bladder Frame, Water Reservoir Backpack Cleaning Kit(Blue)
- THOROUGH CLEANING: EFFECTIVELY CLEANS HYDRATION GEAR WITHOUT DAMAGE.
- VERSATILE BRUSHES: INCLUDES VARIOUS BRUSHES FOR ALL CLEANING NEEDS.
- DURABLE MATERIALS: MADE FROM STAINLESS STEEL FOR LONG-LASTING USE.
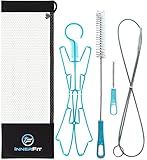
InnerFit Hydration Bladder Cleaning Kit - 5 in 1 Water Bladder Cleaning Kit for Universal Bladders - 3 Brushes - 1 Collapsible Frame - 1 Carrying Pouch
- SOFT, DURABLE BRUSHES PREVENT DAMAGE TO YOUR HYDRATION GEAR.
- EXTEND LIFESPAN WITH LONG BRUSH & COLLAPSIBLE FRAME FOR DRYING.
- STAY ORGANIZED WITH MESH POUCH FOR EASY DRYING & ACCESSIBILITY.
J.CARP Cleaning Kit, Made of Stainless Steel 304, Tough and Enduring, Cleaning Brushes Only
- COMPLETE 4-IN-1 CLEANING KIT FOR HYDRATION BLADDERS AND TUBES.
- DURABLE STAINLESS STEEL BRUSHES FOR LASTING PERFORMANCE AND EFFECTIVENESS.
- COLLAPSIBLE FRAME FOR EASY DRYING AND COMPATIBLE WITH ALL BLADDER BRANDS.
After using a hydration pack, it is essential to dry it properly to prevent the growth of mold. Mold thrives in moist environments, so getting rid of any moisture is crucial. Here are some steps you can follow to dry your hydration pack effectively:
- Empty and clean: First, empty the hydration pack completely by pouring out any remaining water. Remove the reservoir from the backpack if it's removable. Then, wash the reservoir, tube, and mouthpiece with warm water and mild soap. Rinse them thoroughly to ensure all soap residue is removed.
- Wipe and air-dry: Use a clean towel or cloth to wipe the inside of the hydration pack, including the reservoir, tube, and mouthpiece. Pay attention to hard-to-reach areas and corners where moisture may linger. Allow the pack to air-dry completely before proceeding to the next step.
- Hang upside down: Hang the hydration pack upside down to promote proper drainage and airflow. Make sure it is in an open, well-ventilated area. This position helps any remaining moisture to drip out of the reservoir and tube, preventing mold from forming.
- Open all compartments: Open all compartments and zippers on the hydration pack to allow air to circulate freely. This will help to speed up the drying process and prevent any hidden pockets of moisture where mold can grow.
- Store with the cap off: Once the hydration pack is completely dry, store it with the cap off. This will prevent any residual moisture from being trapped and give it the opportunity to breathe. Don't seal the reservoir or put the cap back on until you are ready to use it again.
By following these steps, you can ensure that your hydration pack is thoroughly dried after each use, minimizing the risk of mold growth. Remember, a regular cleaning routine and proper drying will help extend the life of your hydration pack and maintain good hygiene for your water supply.
What is the lifespan of a hydration pack?
The lifespan of a hydration pack can vary depending on the quality and usage. However, a well-maintained and durable hydration pack can typically last anywhere from 3 to 5 years. Factors that may affect its lifespan include the frequency of use, maintenance and care, exposure to extreme temperatures or harsh outdoor conditions, and the quality of materials used in manufacturing. It is important to regularly clean and inspect the hydration pack, replacing any damaged or worn-out parts as needed to ensure its longevity.
How to properly adjust a hydration pack for comfortable use?
To properly adjust a hydration pack for comfortable use, follow these steps:
- Start by putting on the hydration pack like a backpack by sliding your arms through the shoulder straps.
- Adjust the shoulder straps so that the pack sits comfortably on your back, neither too high nor too low. The pack should be snug against your body, but not too tight.
- Adjust the sternum strap across your chest. This strap helps to distribute the weight of the pack evenly and prevents it from bouncing around while you are moving. It should be positioned across your chest at a comfortable height, just below your collarbone.
- Secure the waist belt around your waist, if your pack has one. This adds extra stability and prevents the pack from shifting during physical activities. Adjust the belt so that it rests comfortably on your hips, not too loose or too tight.
- Once the pack is properly positioned and secured, adjust the shoulder straps further to ensure a proper fit. You should be able to comfortably move your arms without feeling restricted, and the pack should not shift or slide while in motion.
- Make sure the hydration bladder inside the pack is properly placed and centered in the designated compartment. Adjust the hose and bite valve so that they are easily accessible and within reach while wearing the pack.
- Take a short walk or test the pack during physical activity to ensure it feels comfortable and secure. Make any necessary adjustments based on your comfort and performance.
Remember, everyone's body is different, so it may take a few tries to find the perfect fit. Adjustments may need to be made depending on the terrain, weather conditions, and the weight of the pack itself.
What is the best cleaning solution for a hydration pack?
There are a few different cleaning solutions that are commonly recommended for cleaning hydration packs:
- Mild soap and water: Using a mild, fragrance-free soap and warm water is a safe and effective option for cleaning hydration packs. Simply fill the pack with warm water and a small amount of soap, then use a brush or sponge to scrub the interior. Rinse thoroughly afterward.
- Baking soda: Baking soda is a natural cleaning agent that can help remove odors and stains from hydration packs. Mix a tablespoon of baking soda with warm water and scrub the pack's interior with a brush or sponge. Rinse thoroughly afterward.
- Vinegar: White vinegar is known for its cleansing properties and can be used to clean hydration packs. Mix equal parts of vinegar and water, then fill the pack and let it sit for about 30 minutes. Afterward, rinse thoroughly with water.
It is important to avoid using harsh chemicals, bleach, or abrasive cleaners, as they may damage the materials of the hydration pack. Always follow the manufacturer's instructions and recommendations for cleaning to ensure the longevity and performance of the pack.
How to clean a hydration pack after each use?
Cleaning a hydration pack after each use is essential to maintain hygiene and prevent the growth of bacteria and odors. Here's a step-by-step guide on how to clean a hydration pack:
- Empty and rinse: Start by emptying the hydration pack completely, pouring out any remaining water or beverage. Remove the reservoir from the pack and detach the drinking tube from both ends. Open all the zippers and remove any contents or pockets.
- Rinse the reservoir: Fill the reservoir with warm water and add a small amount of mild dish soap or a specialized hydration pack cleaner. Gently swish the mixture around, making sure to clean all areas inside the reservoir. Pay close attention to the mouthpiece and bite valve as these areas tend to accumulate the most bacteria.
- Scrub and clean: Use a soft-bristle brush or sponge to scrub the inside of the reservoir, paying particular attention to any stubborn stains or residue. Be gentle and avoid using abrasive materials that could damage the surface of the reservoir. Additionally, scrub the bite valve and any detachable parts.
- Rinse thoroughly: Empty the soapy water and rinse the reservoir and all detachable parts with fresh, clean water. Rinse multiple times to ensure all soap residues are removed. A slight taste of soap inside the pack can make water unpalatable.
- Dry properly: Shake out excess water from the reservoir and let it air dry, leaving it open and in an upright position. Hang the drinking tube and bite valve over a drying rack or clothesline to ensure thorough drying. Make sure that all components are completely dry before reassembling and storing the hydration pack.
- Maintenance considerations: To prevent mold or bacteria from growing inside the hydration pack, store it in a dry and well-ventilated place. Avoid storing it with a wet reservoir or parts, as moisture can lead to unpleasant odors.
Following these steps will help maintain the cleanliness and functionality of your hydration pack, ensuring you can enjoy refreshing and safe hydration on your next outdoor adventure.