
Best Hydration Pack Drying Techniques to Buy in July 2026
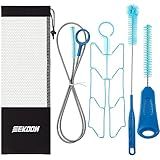
4 Pcs Set Reservoirs Backpack Accessories Hydration Bladder Cleaning Kit with Flexible Long Brush for Hose, Small Bite Valve and Big Brush, Drying Collapsible Bladder Frame, Carrying Pouch (Blue)
- CLEAN THOROUGHLY AND SAFELY WITH OUR 5-IN-1 QUALITY CLEANING KIT.
- VERSATILE BRUSHES TACKLE EVERY SPOT, FROM MOUTHPIECES TO HOSES.
- DURABLE STAINLESS STEEL ENSURES LONG-LASTING PERFORMANCE FOR OUTDOOR USE.


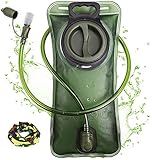
Hydration Bladder, 2L Water Bladder for Hiking Backpack, BPA-Free Leak Proof Water Reservoir Storage Bag, Hydration Pack Replacement for Camping Cycling Running, Military Green
-
EFFORTLESS CLEANING WITH A LARGE OPENING FOR EASY ACCESS AND ICE CUBES.
-
PREMIUM MATERIALS ENSURE NO BAD TASTE AND ENHANCED DURABILITY.
-
HIGH FLOW BITE-VALVE OFFERS QUICK HYDRATION WHILE PREVENTING LEAKS.
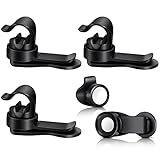
Moxweyeni 3 Pcs Bladder Clip Water Tube Hydration Hose Magnetic Clip Military Backpack Tactical Backpack Accessories Source Hydration Pack Water Bladder Holding Drinking Valve Tube in Place(Black)
- VERSATILE CLIPS: MULTIPURPOSE FASTENERS FOR ALL OUTDOOR ACTIVITIES.
- MAGNETIC CONVENIENCE: SECURE TUBES STAY FLEXIBLE UNDER PRESSURE.
- DURABLE DESIGN: QUALITY ABS ENSURES LONG-LASTING PERFORMANCE.
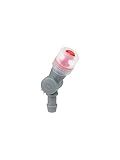
Osprey Hydraulics Bite Valve Replacement
- TWIST SHUT-OFF DESIGN ELIMINATES LEAKS FOR WORRY-FREE ADVENTURES.
- PERFECT FIT FOR OSPREY HYDRAULICS WATER RESERVOIRS.
- ENGINEERED FOR OPTIMAL EFFICIENCY ON EVERY EXPLORATION.
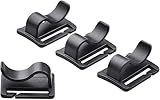
4pcs Black Water Bladder Tube Clips for Hydration Pack,Universal Hydration Pack Water Bladder Bag Beverage Tube Clip Outdoor Backpack Water Bladder Hose Hose Clip,Camping and Hiking Accessories
-
UNIVERSAL FIT: ATTACHES SECURELY TO MOST HYDRATION BLADDERS AND PACKS.
-
BUILT TO LAST: WEATHER-RESISTANT MATERIALS ENSURE DURABILITY IN OUTDOOR USE.
-
EASY TO USE: SNAP-ON DESIGN FOR QUICK ATTACHMENT AND REPOSITIONING.
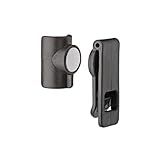
Source Tactical Gear Universal Magnetic Tube Holder Clip (Black)
- EFFORTLESS ATTACHMENT TO SHIRTS OR STRAPS FOR QUICK ACCESS.
- SECURE HOLD WITH EASY RELEASE UNDER PRESSURE FOR DURABILITY.
- COMPATIBLE WITH ALL SOURCE OUTDOORS HYDRATION SYSTEMS.
After cleaning your hydration pack, it is important to dry it thoroughly to prevent the growth of mold and bacteria. Here are some steps to help you dry your hydration pack effectively:
- Start by emptying the hydration pack completely. Pour out any remaining water or cleaning solution.
- Remove the reservoir from the pack if possible. This will make it easier to dry both the reservoir and the pack separately.
- Use a clean, dry towel to wipe the interior of the reservoir and the pack. Absorb as much moisture as possible.
- Leave the reservoir and the pack open to air dry. Find a well-ventilated area, preferably with good air circulation. Hang them up or prop them open to allow air to flow inside.
- For faster drying, use a fan or place the hydration pack in front of a gentle heating source, such as a radiator or heater. However, make sure the heat source is not too close or too hot as it can damage the pack or the reservoir.
- Check on the progress periodically and rotate or reposition them to ensure even drying.
- Make sure to dry all the nooks and crannies, including any tube or hose, as moisture can get trapped in these areas.
- Give the hydration pack ample time to dry completely. Depending on the humidity and airflow, this may take anywhere from a few hours to a day or more.
- Once completely dry, reassemble the hydration pack. Ensure all components are secured properly before storing or using it again.
Remember, proper drying is essential to maintain the cleanliness and functionality of your hydration pack.
What are the risks of not drying a hydration pack properly?
There are several risks associated with not drying a hydration pack properly:
- Mold and mildew growth: If the hydration pack is not thoroughly dried, moisture can get trapped inside the reservoir, tube, and bite valve. This creates an ideal environment for the growth of mold and mildew, which can lead to health issues including allergies, respiratory problems, and infections.
- Bacterial growth: Moisture left in the hydration pack can also promote the growth of bacteria, particularly if the pack has been used with sugary or protein-based fluids. These bacteria can cause gastrointestinal issues and other infections if ingested.
- Foul odor and taste: When water is left inside the hydration pack for an extended period, it can develop a foul odor and taste due to the accumulation of bacteria and mold. This can make it unpleasant to drink from the pack and affect the overall enjoyment of outdoor activities.
- Decreased performance: If the tube or bite valve is not properly dried, it can clog and restrict the flow of water, making it difficult to drink efficiently from the hydration pack. This can be particularly problematic during strenuous activities when regular hydration is crucial.
- Damage to the pack: Prolonged exposure to moisture can cause damage to the hydration pack, including the reservoir, tube, and other components. This can lead to leaks, tears, and deterioration of the pack's functionality and lifespan.
Overall, the risks of not drying a hydration pack properly include the growth of mold, bacterial contamination, foul smell and taste, decreased performance, and damage to the pack.
How often should I dry my hydration pack after cleaning?
It is generally recommended to dry your hydration pack thoroughly after each cleaning to prevent the growth of bacteria and mold. This helps ensure that it remains clean and free from any potential contaminants. Depending on the conditions and how quickly it dries, this typically takes a few hours to overnight. Make sure to keep it open and exposed to air to facilitate drying.
What should I do if my hydration pack doesn't dry completely?
If your hydration pack doesn't dry completely, there are a few steps you can take to address the issue:
- Start by emptying the pack completely and removing all the components, such as the bladder, hose, and bite valve. Inspect them to ensure they are clean and free of any residue or mold.
- If there is water left in the bladder, try to drain it fully by turning it upside down and gently squeezing it. Alternatively, you can use a clean cloth or towel to absorb the excess moisture.
- After draining the remaining water, rinse the bladder with warm soapy water or a mild cleaning solution specifically designed for hydration packs. Use a brush or cloth to thoroughly clean the interior of the bladder and any hard-to-reach areas.
- Rinse the bladder thoroughly to remove any soap or cleaning solution residue. Make sure to rinse the hose and bite valve as well.
- Once cleaned and rinsed, shake out as much water as possible from the bladder and hang it upside down to air dry. Avoid direct sunlight, as it can degrade the bladder material.
- If the bladder still doesn't dry completely, you can use a clean towel or cloth to gently absorb the remaining moisture. Make sure not to leave any pieces of cloth inside the bladder.
- If you're concerned about mold or mildew, you can use a mixture of one part vinegar and three parts water to disinfect the bladder. Fill it with the solution, let it sit for about 30 minutes, then rinse thoroughly before air drying.
- Finally, when storing your hydration pack, make sure it is completely dry to prevent any potential growth of mold or mildew. Consider using a ventilated storage bag or hanging it in a cool, dry place.
By following these steps, you should be able to ensure your hydration pack is clean, dry, and ready for use.
How do I dry the reservoir of a hydration pack?
To dry the reservoir of a hydration pack, follow these steps:
- Empty the reservoir: Empty the reservoir completely by pouring out any remaining water or drinking it.
- Clean the reservoir: If the reservoir needs cleaning, rinse it with warm water and a mild soap solution. Use a bottle brush or reservoir cleaning kit to scrub the inside of the reservoir and remove any residue or dirt. Rinse thoroughly to remove soap completely.
- Drain excess water: Remove any excess water by opening the reservoir's closure system, such as the screw cap or slide closure, and let the water drain out.
- Use a drying rack or hanger: Hang the reservoir upside down on a drying rack or hanger. Ensure that it is fully open to allow air circulation inside. Make sure the reservoir is positioned somewhere with good ventilation.
- Air dry: Leave the reservoir to air dry completely. This may take several hours, depending on the size of the reservoir and the environmental conditions. Avoid direct sunlight, as it may degrade the materials.
- Ensure complete drying: After a few hours, check the reservoir for any moisture. If there are any damp areas, use a clean cloth or paper towel to absorb the remaining moisture.
- Store properly: Once the reservoir is completely dry, reassemble it if it had removable parts, like hoses or bite valves. Store it in a cool, dry place, preferably with the closure system slightly open to allow air circulation.
By following these steps, you can effectively dry the reservoir of your hydration pack to prevent mold or mildew growth and keep it in good condition for future use.
What materials do I need to dry a hydration pack?
To effectively dry a hydration pack, you will need the following materials:
- Clean towel or cloth: You will need a towel or cloth to absorb any excess moisture from the pack.
- Clean, dry paper towels or tissues: These can be used to reach into the small corners and crevices of the hydration pack where the towel may not easily fit.
- Drying rack or clothesline: If possible, it is recommended to hang the hydration pack to dry. A drying rack or clothesline can provide adequate support for this purpose.
- Ventilated area: Choose a well-ventilated area to dry the hydration pack, preferably away from direct sunlight.
- Toothbrush or small cleaning brush: Sometimes, the bite valve or nozzle of the hydration pack may have accumulated dirt or mold. Use a toothbrush or small cleaning brush to gently scrub these areas if required, prior to drying.
Optional materials:
- Hydrophobic microfiber cloth: These specialized cloths are designed to repel and absorb water more efficiently than regular towels. They can be useful, particularly if the hydration pack has a significant amount of moisture.
- Hydration pack cleaning kit: Some cleaning kits come with specific drying tools, such as tube hangers, which can aid in drying the tube and ensuring it stays open for proper air circulation if you are using a tube-style hydration pack.
Remember to thoroughly clean and dry your hydration pack after every use to prevent the growth of bacteria or mold.
How can I speed up the drying process for my hydration pack?
There are several ways to speed up the drying process for your hydration pack:
- Remove excess water: Start by emptying the hydration pack completely and squeezing out any excess water. Use your hands to press against the inner lining of the pack and tube to remove as much moisture as possible.
- Use a towel: Take a clean, absorbent towel and insert it into the hydration pack. Twist the towel inside the pack to help soak up the remaining moisture. Leave it in for a few minutes and repeat with a dry towel if necessary.
- Hang to air dry: Hang your hydration pack upside down in a well-ventilated area, preferably near a fan or in a warm space. Ensure that all the zippers and openings are left open to allow air circulation and speed up drying. Gravity will help drain out any remaining water from the tube.
- Use a drying rack: If you have a drying rack or clothesline, spread out the hydration pack over it, ensuring that all parts are exposed to air. This will speed up the drying process by allowing maximum air circulation.
- Use a hairdryer: Set the hairdryer to a low or cool setting and use it to blow air into the hydration pack. Move the hairdryer around to cover all areas, including the tube and bladder. Be cautious not to use excessive heat or hold the dryer too close to prevent damage to the hydration pack.
- Use a compressed air can: If available, use a compressed air can (often used for cleaning electronics) to blow air through the tube and into the hydration pack. This can help evaporate any trapped moisture and speed up drying.
Remember to ensure that your hydration pack is completely dry before storing it to prevent the growth of mold or mildew.