Best Premiere Pro Editing Tools to Buy in July 2026
XPPen Mini Keydial ACK05 Wireless Shortcut Keyboard Bluetooth Programmable Express Remote Control with Dial & Customized Express Keys for Drawing Tablet PC MacBook Windows Images Video Editing
-
THREE CONNECTION OPTIONS: BLUETOOTH, DONGLE, OR USB FOR ULTIMATE FLEXIBILITY.
-
CUSTOMIZABLE SHORTCUTS: TAILOR UP TO 40 SHORTCUTS FOR ENHANCED PRODUCTIVITY.
-
LONG BATTERY LIFE: ENJOY UP TO 300 HOURS OF CONTINUOUS USE ON A SINGLE CHARGE.


Blackmagic Design Davinci Resolve Speed Editor Bundle with Davinci Resolve 18 Studio (Activation Card)
- PORTABLE & BATTERY-POWERED FOR EDITING ON-THE-GO
- QUICK ACCESS WITH BUILT-IN SEARCH DIAL & KEYBOARD SHORTCUTS
- BLUETOOTH/USB CONNECTIVITY + FREE DAVINCI RESOLVE 17 STUDIO!
TourBox NEO - Customizable Editing Controller, Photo Color Grading Illustration Speed Editor, Intuitive Control Boost Productivity, Programmable Keyboard for Adobe CSP and More, Works with Mac/PC
-
ZERO-LATENCY WIRED CONNECTION: NO DROPS, RELIABLE FOR CREATIVES.
-
COMPATIBLE WITH TOP SOFTWARE: BOOST PRODUCTIVITY IN ANY CREATIVE TASK.
-
INTUITIVE CONTROLS: SIMPLIFY EDITING, DRAWING, AND COLOR GRADING EFFORTLESSLY.
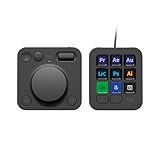
Logitech MX Creative Console, 9 Customizable LCD Keys, Stream Deck Accessories,Connectivity Technology USB-C, Control Dial for Graphic Design, Zoom, Spotify - Graphite, 3-Month Adobe Cloud Membership
-
STREAMLINE YOUR CREATIVITY: ACCESS TOOLS QUICKLY TO ENHANCE WORKFLOW.
-
FULLY CUSTOMIZABLE: PERSONALIZE UP TO 15 APP PROFILES WITH EASE.
-
FREE ADOBE CREATIVE CLOUD: GET 3 MONTHS OF ADOBE FOR ENHANCED CREATIVITY!
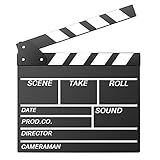
Movie Film Clap Board, Hollywood Clapper Board Wooden Film Movie Clapboard Accessory with Black & White, 12"x11" Give Away White Erasable Pen
- CLASSIC WOODEN CLAPPER: PERFECT FOR CHALK USE AND EASY TO ERASE.
- VERSATILE FOR EVENTS: IDEAL FOR PARTIES, AWARDS, AND SCHOOL PROJECTS.
- INCLUDES ERASABLE PEN: EFFORTLESS WRITING AND CLEANING FOR HASSLE-FREE USE.
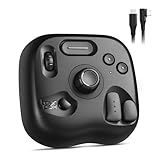
TourBox Lite - Editing Keyboard Compact, Artists Go-to Drawing Macro Keypad, Works with Photoshop, CSP & More, Creative Controller with Custom Software, Streamline All Workflows - Wired Only
- MASTER CREATIVITY FAST: 98% OF USERS LEARN CORE FUNCTIONS IN JUST 7 DAYS.
- EFFORTLESS CONTROL: 8 CUSTOMIZABLE BUTTONS UNLOCK OVER 200 FUNCTIONS.
- NATURAL GRIP DESIGN: ERGONOMIC SHAPE REDUCES STRAIN DURING LONG SESSIONS.
To edit a video in Adobe Premiere Pro, you can follow these steps:
- Import Media: Start by launching Adobe Premiere Pro and creating a new project. Import your video files by selecting File > Import. Browse and select the media you want to edit, then click "Import."
- Organize Clips: In the Project panel, you will see all the imported media files. Drag and drop the video clips to the Timeline panel to begin editing. Arrange them in the desired order.
- Trim Clips: To remove unwanted parts of a clip, position the playhead on the timeline where you want to make the cut. Then, use the "Razor" tool to split the clip into segments. Delete the undesired portion by selecting it and pressing "Delete."
- Add Transitions: Transitions can add a professional touch to your video. Go to the Effects panel and search for transitions. Drag and drop the desired transition between two clips in the timeline. Adjust the duration and customize it as needed.
- Apply Effects: Premiere Pro offers a wide range of video effects to enhance your footage. Go to the Effects panel and explore various categories like color correction, blur, or stylize. Drag and drop an effect onto a clip, then adjust the effect properties using the Effect Controls panel.
- Audio Editing: To adjust audio levels, select the clip on the timeline and open the Essential Sound panel. Use the sliders to control the volume of either the entire clip or specific frequency ranges. You can also add background music or sound effects by importing audio files and placing them on separate audio tracks.
- Text and Graphics: To add titles or captions, go to the Graphics workspace. Click on the "Type Tool" to create a text layer. Customize the font, size, color, and position by selecting the text layer and using the "Essential Graphics" panel.
- Export Video: Once you have completed the editing process, go to File > Export > Media. Choose the desired video format, resolution, and destination folder. Click "Export" to save your edited video.
Adobe Premiere Pro provides numerous other editing options and features, allowing you to create professional-looking videos. With practice and experimentation, you can refine your editing skills in this powerful software.
What are the options for adjusting audio levels in Premiere Pro?
In Adobe Premiere Pro, there are several options for adjusting audio levels:
- Clip Mixer: The Clip Mixer allows you to adjust the audio levels of individual clips in your timeline. You can increase or decrease the volume by dragging the slider up or down for each clip.
- Track Mixer: The Track Mixer allows you to adjust the audio levels of entire tracks in your timeline. You can adjust the volume of multiple clips at once by selecting the track and dragging the slider up or down.
- Effect Controls: You can also adjust audio levels using the Effect Controls panel. Select the clip or track, go to the "Effect Controls" tab, and locate the "Volume" option. You can adjust the volume by dragging the slider or using numerical values.
- Keyframes: Premiere Pro allows you to add keyframes to audio clips. Keyframes represent specific points in time where you can set different audio levels. By using keyframes, you can create gradual or abrupt changes in volume over time.
- Audio Gain: You can adjust the audio gain to increase or decrease the overall volume of a clip or track. Right-click on the clip or track, select "Audio Gain," and adjust the value to increase or decrease the volume level.
- Essential Sound Panel: Premiere Pro offers the Essential Sound panel, which provides easy-to-use tools for adjusting audio levels. You can choose from various audio presets, such as Dialogue, Music, or SFX, or manually adjust settings like volume, clarity, or loudness.
These options in Premiere Pro give you a range of ways to adjust audio levels based on your specific needs and preferences.
Is it possible to remove background noise from audio in Premiere Pro?
Yes, it is possible to remove background noise from audio in Adobe Premiere Pro. Premiere Pro has a built-in audio effects panel that includes tools for reducing background noise and enhancing audio quality.
To remove background noise, follow these steps:
- Select the audio clip in the timeline.
- Go to the "Effects" panel, then expand the "Audio Effects" folder.
- Navigate to the "DeNoiser" effect and drag it onto the audio clip.
- In the "Effect Controls" panel, adjust the "Noise Reduction" slider to reduce the background noise.
- You can also fine-tune the settings by adjusting the "Reduce By" and "Reduce" knobs.
Keep in mind that completely removing all background noise can be challenging, especially if it is mixed with the desired audio. It is recommended to use a high-quality microphone and record audio in a controlled environment to minimize background noise during the recording process.
How can I trim and rearrange clips in Premiere Pro?
To trim and rearrange clips in Premiere Pro, you can follow these steps:
- Import your media: Start by importing your video and audio clips into Premiere Pro. You can do this by navigating to "File" and selecting "Import" or by using the shortcut Ctrl+I (Cmd+I for Mac) and selecting the files you want to import.
- Create a sequence: Drag and drop your clips into the timeline to create a sequence. If the sequence settings don't match your footage, you can right-click on the clip and select "New Sequence from Clip" to automatically create a sequence that matches the footage settings.
- Trimming clips: To trim a clip, click on the edge of the clip in the timeline, and you will see a yellow trim handle. Drag the handle to the desired position to cut off unwanted footage. Alternatively, you can use the "Razor Tool" (shortcut C) to cut the clip at specific points.
- Rearranging clips: To rearrange clips in a timeline, click and drag the clip to the desired position. You can also use the "Insert" and "Overlay" options under the Edit menu or use the shortcuts Ctrl+K (Cmd+K) for Insert and Ctrl+Alt+V (Cmd+Opt+V) for Overlay.
- Ripple Edit tool: The Ripple Edit tool (shortcut B) can be used to automatically adjust the timeline duration when clips are trimmed or moved. Select the tool and drag the edge of a clip to automatically adjust neighboring clips to fit the new duration.
- Trim mode: Premiere Pro also has a dedicated Trim mode that allows you to make precise adjustments to the in and out points of clips. To enter Trim mode, click on the wrench icon in the Program Monitor, and select "Trim Mode." In Trim mode, you can easily trim clips using various techniques such as roll edits, ripple edits, and slip edits.
- Playback and review: After making the adjustments, play back your sequence to ensure everything is edited and arranged to your satisfaction. You can use the Spacebar or the Play button in the Program Monitor to preview your edited clips.
Remember to save your project regularly to avoid losing any changes.
Can I edit multiple videos at once in Premiere Pro?
Yes, you can edit multiple videos at once in Adobe Premiere Pro. Premiere Pro allows you to work with multiple sequences, which you can use to edit different videos simultaneously. You can also use the Multi-Camera editing feature to edit multiple camera angles together in the same timeline. Additionally, you can open multiple projects in separate tabs or use the Project Manager to consolidate multiple projects into a single project for editing purposes.
What are the different export formats available in Premiere Pro?
There are several export formats available in Adobe Premiere Pro, including:
- MPEG-4: This is a widely used format for online videos and is compatible with various devices and platforms.
- H.264: Also known as Advanced Video Coding (AVC), this format is widely supported and provides high-quality video compression.
- QuickTime: It is a multimedia container format that supports various codecs and is commonly used on macOS.
- ProRes: This is a high-quality video format developed by Apple and is commonly used in professional video editing workflows.
- DNxHD/DNxHR: These are codecs developed by Avid Technology and commonly used in professional video editing systems.
- HEVC: Also known as H.265, this format offers efficient compression and is suitable for high-resolution videos.
- MXF: This is a container format commonly used in professional video production and broadcasting workflows.
- uncompressed AVI: This format offers lossless video compression and is commonly used for high-quality video storage.
- Animated GIF: This format supports animations and is commonly used for sharing short video clips on the web.
- YouTube/Vimeo: Premiere Pro also provides presets specifically tailored for directly uploading videos to platforms like YouTube and Vimeo.
These are just a few examples, and Premiere Pro offers a wide range of export format options to cater to various needs and requirements.
Can I add 3D effects or text to my videos in Premiere Pro?
Yes, you can add 3D effects and text to your videos in Adobe Premiere Pro. Premiere Pro offers a variety of tools and features to create and manipulate 3D effects, including the ability to import and animate 3D models and add depth to your videos. Additionally, you can easily add text to your videos and customize its appearance using Premiere Pro's built-in text tools.
Is it possible to track an object or person's movement in Premiere Pro?
No, tracking object or person's movement in Premiere Pro is not possible. Premiere Pro is primarily a video editing software and does not have built-in motion tracking capabilities like Adobe After Effects, which can be used to track and apply effects to moving objects or people. However, it is possible to import footage from Premiere Pro into After Effects for more advanced motion tracking and effects.