
Best Adobe Premiere Pro Tools to Buy in July 2026
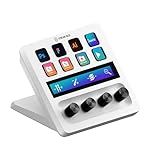
Elgato Stream Deck + White - Studio Controller with LCD Keys, Dials, and Touch Strip for Post Production in Adobe Premiere Pro, Photoshop, DaVinci Resolve, Final Cut Pro - Workflow Automation
- STREAMLINE EDITING WITH A CREATIVE WORKFLOW TOOL FOR EFFICIENCY.
- LAUNCH SHORTCUTS EFFORTLESSLY USING 8 LCD KEYS AND 4 DIALS.
- COMPATIBLE WITH ADOBE APPS FOR SEAMLESS VIDEO AND DESIGN WORK.


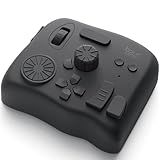
TOUR BOX Elite - Bluetooth Video Editing Controller Color Grading Speed Editor, Intuitive Control, Professional Digital Creator Console for Davinci, Premiere, Final Cut Pro and More, Mac/PC (Black)
-
DUAL CONNECTIVITY ENSURES STABLE PERFORMANCE ON MACOS AND WINDOWS.
-
EXTENSIVE COMPATIBILITY WITH MAJOR CREATIVE SOFTWARE BOOSTS VERSATILITY.
-
POWERFUL CUSTOM SYSTEM FOR TAILORED CONTROLS ENHANCES WORKFLOW EFFICIENCY.
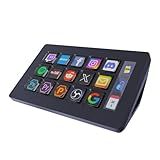
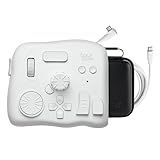
Basicolor Macro Pad,Stream Controller Deck with 15 Customizable Macro Keys Compatible with OBS/PowerPoint/Excel/Youtube/Word/Photoshop/Adobe Premiere Pro Windows 10/Mac14.0 (293SV3) Black
- CUSTOMIZE 15 LCD KEYS WITH IMAGES FOR EASY RECOGNITION AND USE!
- EXECUTE ANY COMMAND WITH A SINGLE CLICK FOR ULTIMATE EFFICIENCY.
- COMPATIBLE WITH WINDOWS/MACOS AND MAJOR APPS FOR SEAMLESS INTEGRATION.
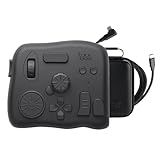
TourBox Elite - Bluetooth Video Editing Controller Color Grading Speed Editor, Intuitive Control, Professional Digital Creator Console for DaVinci, Premiere, Final Cut Pro and More, Mac/PC (Black Set)
-
DUAL CONNECTIVITY (BLUETOOTH & USB-C) FOR SEAMLESS, PRO PERFORMANCE.
-
CUSTOMIZABLE CONTROLS TAILORED TO YOUR UNIQUE CREATIVE WORKFLOW.
-
INTUITIVE EDITING WITH TACTILE FEEDBACK FOR ENHANCED PRECISION AND SPEED.
TourBox Elite - Bluetooth Video Editing Controller Color Grading Speed Editor, Intuitive Control, Professional Digital Creator Console for DaVinci, Premiere, Final Cut Pro and More, Mac/PC (White Set)
- DUAL CONNECTIVITY (BLUETOOTH & USB-C) FOR VERSATILE, SEAMLESS USE.
- CUSTOMIZABLE CONTROLS TAILORED TO YOUR CREATIVE WORKFLOW AND TOOLS.
- EXTENSIVE SOFTWARE COMPATIBILITY FOR ALL YOUR EDITING AND DESIGN NEEDS.
To add a background in Adobe Premiere Pro, follow these steps:
- Launch Adobe Premiere Pro and open your project.
- Import the background footage that you want to use. Go to "File" -> "Import" to select and import the file from your computer.
- Drag and drop the background footage to the video track on the timeline, below the main video clip or any other existing clips.
- Adjust the duration of the background footage to match the length of your video. You can trim the clip by dragging the edges in the timeline.
- To adjust the position of the background, go to the "Effect Controls" panel. If the panel is not visible, go to "Window" -> "Effect Controls" to open it.
- Select the background footage in the timeline and navigate to the "Effect Controls" panel. Look for the "Motion" options and expand it if necessary.
- Adjust the positions of the footage using the "Position" parameters. You can do this either by manually inputting values or by dragging the footage within the Program Monitor using the mouse.
- If needed, you can also resize the background footage by adjusting the "Scale" parameter.
- Apply any additional visual effects or adjustments to the background footage, such as color correction, by navigating to the "Effect Controls" panel and experimenting with various options available.
- Once you are satisfied with the background, preview the final result by playing the timeline. You can make further adjustments if necessary.
- Save your project and export your video by going to "File" -> "Export" -> "Media". Choose your desired export settings and click on "Export" to generate the final video with the background added.
That's it! You have successfully added a background in Adobe Premiere Pro. Remember to save your changes frequently throughout the process to avoid losing any work.
What are the effects that can be applied to a background in Adobe Premiere Pro?
In Adobe Premiere Pro, there are various effects that can be applied to a background. Some of the main effects include:
- Blur: This effect blurs the background, creating a soft and less detailed appearance.
- Color Correction: This effect allows users to adjust the colors of the background, such as increasing or decreasing the brightness, contrast, saturation, or tint.
- Chroma Keying: Also known as green screen or blue screen, this effect allows users to remove a specific color from the background and replace it with another video or image.
- Noise Reduction: This effect reduces the amount of noise or grain in the background, resulting in a cleaner and smoother look.
- Motion Blur: This effect adds a blur to the background motion, giving a sense of speed or movement.
- Desaturate: This effect removes the color from the background, making it grayscale or black and white.
- Sharpen: This effect enhances the details in the background, making it appear sharper and more defined.
- Distort: This effect allows users to warp or distort the background, creating various visual effects like ripples, waves, or twirls.
- Stylize: This effect applies various artistic or stylized effects to the background, such as a cartoon, oil painting, or sketch look.
- Mosaic: This effect pixelates the background, creating a mosaic or pixelated pattern.
These are just a few examples, and there are many more effects available in Adobe Premiere Pro to manipulate and enhance backgrounds in videos.
What are the different types of backgrounds that can be added in Adobe Premiere Pro?
In Adobe Premiere Pro, there are various types of backgrounds that can be added to a video project. Some of these backgrounds include:
- Solid Color Background: This is a single colored background that can be chosen from the color picker or by defining the specific RGB values.
- Gradient Background: It allows users to create a gradual blend of two or more colors, which can create a dynamic look and feel to the background.
- Video Background: Users can import a video file and use it as a background for their project. This can be any type of video footage, such as a scenic view or abstract animation.
- Image Background: Users can import an image file and set it as a background. This could be a photograph or graphic element that complements the video content.
- Motion Background: Premiere Pro offers built-in motion background templates that can be customized and added to enhance the visual appeal of the project. These templates often include animated patterns or abstract designs.
- Transparent Background: Users can create a transparent background by removing the alpha channel of a video or image file. This allows the background to be transparent, revealing the content behind it.
- Green Screen Background: Also known as chroma keying, this technique involves removing a specific color (usually green or blue) from a video and replacing it with a different background. This is commonly used for adding special effects or replacing background scenery.
These are just a few examples of the different types of backgrounds that can be added in Adobe Premiere Pro. The software offers a wide range of customization options, allowing users to create unique and visually appealing backgrounds for their video projects.
What is the method for cropping a background in Adobe Premiere Pro?
To crop a background in Adobe Premiere Pro, follow these steps:
- Open the Premiere Pro project and import the footage with the background you want to crop.
- Create a new sequence and drag the footage onto the timeline.
- In the Effects panel, search for the "Crop" effect and apply it to the footage layer.
- Locate the Effect Controls panel and find the Crop effect applied to the clip.
- Adjust the crop settings by changing the values for Left, Right, Top, and Bottom to crop the background.
- To maintain the aspect ratio of the footage while cropping, enable the "Uniform Scale" checkbox. Otherwise, you can manually adjust the width and height separately.
- Preview the result in the Program monitor to ensure you've achieved the desired crop.
- If necessary, you can further refine the crop by adding keyframes to adjust the cropping over time or animate the crop effect.
Remember to save your project after making any changes or adjustments.
What are the essential tips for selecting a suitable background in Adobe Premiere Pro?
- Consider the purpose and tone of your video: The background should align with the overall theme and convey the desired mood. For example, a bright and vibrant background might be suitable for a happy and lively video, while a dark and moody background may be better for a suspenseful or serious video.
- Pay attention to color and contrast: Ensure that the colors in your background do not clash with your subject and text overlays. This will make your video visually appealing and easy to watch. Additionally, consider using contrasting colors for text to make it legible against the backdrop.
- Choose a visually interesting background: A visually engaging background can capture and maintain the viewer's attention. Look for backgrounds with textures, patterns, or dynamic elements that add visual interest. However, make sure it does not distract from the main focus of the video.
- Keep it simple and uncluttered: Avoid selecting backgrounds that are too busy or cluttered with elements that may distract viewers. A clean and simple background can help direct the attention to the subject matter of your video.
- Consider the composition: The background should enhance the composition of your video. Experiment with different angles, framing, and positioning of your subject to see how it interacts with the background. This will help create a visually pleasing and balanced composition.
- Use transparency and blending options: Premiere Pro allows you to adjust the opacity and blending modes of your background clips. Experiment with these settings to create unique and seamless blends with your subject.
- Use stock footage or create custom backgrounds: If you don't have a suitable background, you can utilize stock footage websites or create your own custom backgrounds using tools in Premiere Pro or other design software. This will give you more control over the visual elements and ensure they align perfectly with your video.
- Preview and test before finalizing: Always preview your video with different background options to see how they look in action. Make sure the background doesn't overpower the subject, and assess its impact on the overall video quality before making the final selection.
Remember, the key is to maintain consistency and coherence between the subject matter, background, and the overall theme of your video. Ultimately, the suitable background should enhance the content and engage the viewers without overpowering the main message.
What is the process of syncing background audio with video in Adobe Premiere Pro?
The process of syncing background audio with video in Adobe Premiere Pro can be done in the following steps:
- Import the video and audio files: Start by importing both the video and audio files into your Premiere Pro project. You can do this by going to the "File" menu, selecting "Import", and then choosing the corresponding files.
- Create a new sequence: After importing the files, right-click on one of them in the Project panel and select "New Sequence from Clip." This will create a sequence with the same settings as the video clip.
- Place the video and audio on the timeline: Drag the video clip from the Project panel to the timeline, and place it on the Video track. Similarly, drag the audio clip to the timeline and position it on the Audio track.
- Determine the sync point: Scrub through the video and audio clips to identify a specific point where you want to sync them up. This could be a visual cue or an audible sound that appears in both clips.
- Mark the sync point: Once you have identified the sync point, move the playhead to that point on the timeline. Then, hold down the Command key (Mac) or Control key (Windows) and click on the video and audio clips to select them.
- Synchronize the clips: With the clips selected, right-click and choose "Synchronize" from the context menu. A dialogue box will appear where you can choose the synchronization method. Select "Audio" to sync them based on the audio waveforms.
- Confirm sync: After selecting the synchronization method, click "OK" to apply the sync operation. Premiere Pro will then analyze the audio waveforms of both clips and automatically align them.
- Fine-tune the sync: In some cases, the automatic sync may not be perfect. To fine-tune it, you can manually adjust the position of the audio clip on the timeline. Use the arrow keys to nudge the clip left or right until it aligns perfectly with the video.
- Review and edit: Play back the video and audio together to confirm that they are in sync. Make any necessary adjustments by repeating step 8 if needed.
- Complete the project: Once you are satisfied with the sync, you can continue editing your video as desired. The background audio will now stay synchronized with the video throughout the project.
Remember to save your project regularly to avoid losing any progress.
How to change the background color in Adobe Premiere Pro?
To change the background color in Adobe Premiere Pro, you can follow these simple steps:
- Open the project and navigate to the "Color" tab in the "Essential Graphics" panel.
- In the "Color" panel, click on the eyedropper tool ("Pick a color from the screen") at the top left corner of the panel.
- Move the eyedropper tool over the area of the screen where you want to pick a color. Click once to select the color.
- Once you have selected the color, it will appear as a swatch in the "Color" panel. You can adjust the hue, saturation, and brightness of the color using the sliders in the panel.
- To apply the background color, drag and drop the color swatch from the "Color" panel onto the "Background" layer in the timeline.
- The background color will be changed to the color you selected.
Note: If you prefer to use a solid color for the background, you can also create a new color matte by going to "File" > "New" > "Color Matte". Then, choose your desired color and drag and drop it onto the "Background" layer in the timeline.
What is the purpose of adding a background in a video?
The purpose of adding a background in a video is to enhance the visual appearance, create a specific atmosphere, set the context, and provide additional information or context to the viewers.
- Visual Appeal: Backgrounds can make a video visually appealing by adding depth, texture, or patterns. It prevents the video from looking bland or empty, making it more engaging and aesthetically pleasing.
- Atmosphere and Setting: The background sets the mood or atmosphere of the video. It helps to create the desired ambiance, whether it's a peaceful natural environment, a bustling cityscape, a cozy indoor setting, or a futuristic world. The background can also establish the time and place of the video, adding to its overall context.
- Contextual Information: Backgrounds can provide additional context or information related to the subject matter of the video. For example, if the video is about a famous landmark, including the landmark in the background helps viewers identify the location. Similarly, a background with props or objects can indicate the theme or topic of the video.
- Storytelling: Backgrounds can be used creatively to support storytelling. They can help portray a specific narrative or create a sense of continuity. For example, a video with changing backgrounds can indicate a progression of time or transition between different scenes.
Overall, adding a background in a video serves to enhance the visual appeal, establish context, create atmosphere, and provide additional information to captivate and engage the viewers.