
Best Ceiling Fans with Light Kits to Buy in July 2026
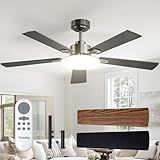
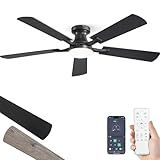
Passky Ceiling Fans with Lights, 52 inch Sleek Ceiling Fan with Light and Remote Control, 3CCT, Dimmable, Reversible, Noiseless, Black Ceiling Fan for Bedroom, Living Room
- ENERGY EFFICIENT: SAVE 80% ON ELECTRICITY WITH OUR A-RATED CEILING FAN.
- CUSTOM CONTROL: ENJOY 6 SPEEDS, DIMMING, AND COLOR TEMP VIA REMOTE.
- QUIET DESIGN: OPERATE AT JUST 35DB FOR PEACEFUL SLEEP AND COMFORT.


addlon Ceiling Fans with Lights, 42 Inch Low Profile Ceiling Fan with Light and Remote Control, Flush Mount, Reversible, 3CCT, Dimmable, Quiet, Black Small Ceiling Fan for Bedroom Indoor/Outdoor Use
- ENERGY-EFFICIENT DESIGN SAVES UP TO 80% ELECTRICITY!
- REMOTE CONTROL WITH TIMER & MEMORY FOR ULTIMATE CONVENIENCE.
- DIMMABLE LIGHT WITH 3 COLOR TEMPS FOR ANY OCCASION.
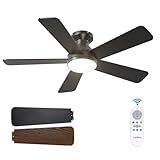
Amico Ceiling Fans with Lights, 42 inch Low Profile Ceiling fan with Light and Remote Control, Flush Mount, Reversible, 3CCT, Dimmable, Noiseless, Black Ceiling Fan for Bedroom, Indoor/Outdoor Use
-
ENERGY EFFICIENT DESIGN: SAVE 80% ON ELECTRIC BILLS WITH A-RATED EFFICIENCY!
-
CUSTOMIZABLE COMFORT: REMOTE CONTROL FOR 6 SPEEDS AND DIMMABLE LIGHT.
-
QUIET OPERATION: ENJOY PEACEFUL SLEEP WITH NOISE LEVELS AS LOW AS 35DB.
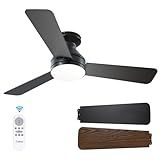
Ohniyou Ceiling Fans with Lights, 52'' Low Profile Ceiling Fan with Light and Remote/APP Control, Modern Flush Mount Ceiling Fan for Indoor Bedroom Living Room, Dimmable, Qiuet DC Motor, Black
- CONTROL FAN & LIGHT VIA APP/REMOTE; ENJOY HANDS-FREE CONVENIENCE!
- ULTRA-QUIET DC MOTOR ENSURES COMFORT WITH 6-SPEED AIRFLOW OPTIONS.
- STYLISH DESIGN FITS ANY DECOR; IDEAL FOR YEAR-ROUND CLIMATE CONTROL.
ZMISHIBO 52 Inch Ceiling Fan with Light, App&Remote Control, Flush Mount Low Profile, Dimmable 20W LED Light, Quiet Reversible Motor for Bedroom, Living Room, Apartment, Black
- IDEAL FOR SPACIOUS ROOMS: 52-INCH FAN WITH 20W BRIGHT LIGHT.
- SMART CONTROL: APP & REMOTE, DIMMABLE, AND COLOR TEMPERATURE SETTINGS.
- QUIET, EFFICIENT AIRFLOW; STYLISH DESIGN FOR YEAR-ROUND COMFORT.

ZMISHIBO Ceiling Fans with Lights and Remote, 19.7'' Low Profile Ceiling Fan, 3000-6000K Dimmable Modern Flush Mount LED Fan Light, 6 Wind Speeds, Black Fandelier Ceiling Fans for Bedroom
-
SMART CONTROL: ADJUST BRIGHTNESS AND FAN SPEED VIA APP OR REMOTE EFFORTLESSLY.
-
ENERGY EFFICIENT LIGHTING: 120V LED, CUSTOMIZABLE BRIGHTNESS, AND MEMORY FEATURE.
-
WHISPER-QUIET PERFORMANCE: ENJOY COMFORT WITH STRONG AIRFLOW AND NO NOISE INTERRUPTIONS.
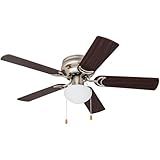
Prominence Home Alvina, 42 Inch Traditional Flush Mount Indoor LED Ceiling Fan with Light, Pull Chain, Dual Finish Blades, Reversible Motor - 80029-01 (Brushed Nickel)
- IDEAL FOR SMALL SPACES UP TO 100 SQ. FT. WITH CUSTOMIZABLE AIRFLOW.
- CONVENIENT PULL CHAINS FOR EASY CONTROL OF SPEED AND LIGHT.
- STYLISH LOW-PROFILE DESIGN WITH DUAL-FINISH BLADES TO MATCH DECOR.
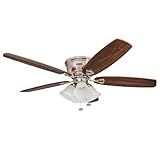
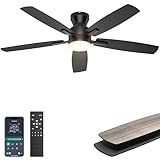
Honeywell Ceiling Fans Glen Alden, 52 Inch Classic Flush Mount Indoor LED Ceiling Fan with Light, Pull Chain, Quick-2-Hang Dual Finish Blades, Reversible Motor - 50182 (Brushed Nickel)
-
IDEAL FOR MEDIUM TO LARGE ROOMS-PERFECT FOR SPACES UP TO 400 SQ FT!
-
ENERGY-EFFICIENT LIGHTING: 600 LUMENS WITH 4 INCLUDED BULBS, 3000K WARM.
-
POWERFUL AIRFLOW YEAR-ROUND: ENHANCES COMFORT IN ANY SEASON EFFORTLESSLY.
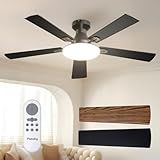
Passky Ceiling Fans with Lights, 52 inch Flush Mount Ceiling fan with Remote Control, Low Profile Ceiling Fan for Bedroom, Farmhouse, Reversible, 3CCT, Dimmable, Noiseless DC Motor, Black
-
ENERGY EFFICIENT DESIGN: SAVE 80% ON ELECTRICITY VERSUS TRADITIONAL FANS!
-
QUIET OPERATION: ENJOY PEACEFUL COMFORT WITH JUST 35DB NOISE LEVEL.
-
CUSTOMIZABLE LIGHTING: DIMMABLE & ADJUSTABLE COLOR TEMPERATURE FOR ANY MOOD!
Installing a ceiling fan with a light kit can significantly enhance the comfort and aesthetics of your home. As we move into 2025, advancements in smart technology have made these installations easier and more energy-efficient. This guide will take you through the process step by step to ensure a successful installation.
Why Install a Ceiling Fan with a Light Kit?
Ceiling fans with light kits are popular for a variety of reasons. Not only do they provide much-needed illumination and airflow, but they can also reduce energy consumption by promoting better air circulation. For more insights, check out this in-depth guide on how ceiling fans work.
Tools and Materials Needed
Before starting the installation, ensure you have the following tools and materials:
- Ceiling fan with light kit
- Ladder
- Screwdrivers (Phillips and flathead)
- Wire strippers
- Voltage tester
- Pliers
- Circuit tester
- Drill and drill bits
- Ceiling fan-rated electrical box
- Screws and fasteners
- Wire connectors
- Tape measure
Safety Precautions
- Turn Off Power: Always turn off the power to the circuit where you’ll be installing your ceiling fan. Use a circuit tester to ensure the power is off.
- Follow Manufacturer Instructions: While this guide provides a general overview, always refer to the specific instructions provided by the manufacturer for your fan model.
Step-by-Step Installation Guide
Step 1: Choose the Right Location
Ensure the ceiling fan will have a solid and stable mounting point. The location should ideally be in the center of the room for balanced airflow.
Step 2: Assemble the Ceiling Fan
- Assemble your fan on the ground following the manufacturer’s instructions.
- Attach the blades to the motor housing if it isn’t pre-assembled.
Step 3: Install the Fan Brace and Electrical Box
- Install the Ceiling Fan Brace: Securely attach a fan brace between joists in the ceiling. This will support the weight of the fan.
- Attach the Electrical Box: Install a ceiling fan-rated electrical box to the fan brace.
Step 4: Mount the Ceiling Fan
- Feed the wires from the ceiling through the canopy ring and fan motor assembly.
- Attach the fan motor to the mounting bracket.
- Secure the canopy by tightening the screws.
Step 5: Wire the Fan and Light Kit
- Use a voltage tester to confirm that the power is off before handling wires.
- Connect the wires from the fan to the wires in the ceiling using wire connectors. Typically, match white to white, blue to black or red (for fan), and connect the ground wire securely.
- Attach the light kit to the fan following the instructions, usually connecting black or blue for the light kit and securing it with screws.
Step 6: Attach the Fan Blades and Light Bulbs
- Fasten the fan blades to the brackets and tighten screws.
- Install appropriate light bulbs into the kit.
Step 7: Install and Program Your Fan’s Remote Control
If your fan comes with a remote control, install the receiver in the canopy area as directed. Programming may vary, so refer to your manual. Learn more about controlling multiple ceiling fans with one remote.
Step 8: Test the Ceiling Fan
- Restore power to the circuit.
- Turn on the fan and light to ensure they are functioning correctly.
- Use the remote control to test different settings.
Conclusion
Installing a ceiling fan with a light kit in 2026 can be a smooth process if you follow these steps with precision and safety in mind. This upgrade not only improves the comfort of your home but can also be an introduction to integrating smart home devices like remote controls. Enjoy your new ceiling fan and its many benefits!
By following this guide, you can create a more comfortable and energy-efficient home environment. Don’t forget to explore the additional resources linked in this article for a deeper understanding of ceiling fan functionalities.