
Best Hydration Cleaning and Maintenance Tools to Buy in July 2026

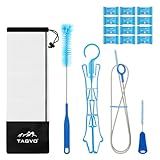
4 Pcs Set Reservoirs Backpack Accessories Hydration Bladder Cleaning Kit with Flexible Long Brush for Hose, Small Bite Valve and Big Brush, Drying Collapsible Bladder Frame, Carrying Pouch (Blue)
-
5-IN-1 KIT: SAFE, DURABLE MATERIALS FOR EFFECTIVE CLEANING.
-
VERSATILE BRUSHES: CLEAN MOUTHPIECES AND TUBES WITH EASE.
-
DURABLE DESIGN: STAINLESS STEEL ENSURES LONG-TERM OUTDOOR USE.


TAGVO Hydration Bladder Cleaning Kit, 6 in 1 Water Bladder Cleaner Set - 3 Brushes, Collapsible Hanger, 12 Cleaning Tablets & Carry Pouch, Water Reservoir Backpack Cleaning Tools
-
COMPREHENSIVE KIT: INCLUDES EVERYTHING FOR HASSLE-FREE CLEANING!
-
FITS MOST BLADDERS: COMPATIBLE WITH 2-3L HYDRATION PACKS FOR EASY USE.
-
OUTDOOR ESSENTIAL: PERFECT GIFT FOR HIKERS TO MAINTAIN HEALTH & HYGIENE!
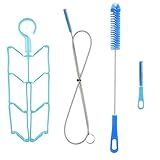
J.CARP Cleaning Kit, Made of Stainless Steel 304, Tough and Enduring, Cleaning Brushes Only
- 4-IN-1 KIT: COMPREHENSIVE CLEANING FOR HYDRATION BLADDERS & HOSES!
- DURABLE STAINLESS STEEL: STRONG, LONG-LASTING BRUSHES FOR EFFECTIVE USE!
- SPACE-SAVING FRAME: COLLAPSIBLE DESIGN FOR EASY DRYING & STORAGE!
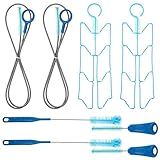
Patelai 2 Set 8 in 1 Hydration Bladder Cleaning Kit Includes 3 Different Brushes and Drying Collapsible Bladder Frame, Water Reservoir Backpack Cleaning Kit(Blue)
-
THOROUGH CLEAN: 8-IN-1 KIT ENSURES NO DIRT IN YOUR HYDRATION GEAR.
-
VERSATILE DESIGN: MULTIPLE BRUSHES FOR EVERY CLEANING NEED AND SPACE.
-
DURABLE QUALITY: STAINLESS STEEL CONSTRUCTION GUARANTEES LONG-LASTING USE.
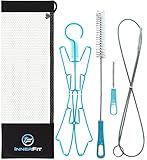
InnerFit Hydration Bladder Cleaning Kit - 5 in 1 Water Bladder Cleaning Kit for Universal Bladders - 3 Brushes - 1 Collapsible Frame - 1 Carrying Pouch
- SOFT, DURABLE BRUSHES CLEAN WITHOUT DAMAGING YOUR GEAR.
- EXTEND HYDRATION GEAR LIFESPAN WITH EASY, THOROUGH CLEANING.
- CONVENIENT MESH POUCH KEEPS CLEANING ACCESSORIES ORGANIZED.
CamelBak Crux Reservoir Hydration Bladder Cleaning Kit- Reservoir and Tube Brushes, Hanger, and Cleaning Tabs
- TASTE-FREE EXPERIENCE WITH DUAL BRUSHES AND CLEANING TABS.
- ESSENTIAL TOOLS: RESERVOIR BRUSH AND PURE FLOW TUBE BRUSH INCLUDED.
- PERIODIC CLEANING FOR FRESH TASTE, FREE FROM ODORS AND CONTAMINANTS.
To clean and maintain the hydration tube and bite valve of your hydration system, follow these steps:
- Start by detaching the hydration tube from the reservoir or backpack. Remove the bite valve as well.
- Rinse the hydration tube thoroughly with warm water to remove any dirt or debris. You can use a specially designed brush or simply swirl the water back and forth inside the tube, squeezing it occasionally to dislodge any residue.
- Create a cleaning solution by mixing mild soap or detergent with warm water. Dip the brush into this solution and scrub the inside of the tube, paying attention to hard-to-reach areas.
- After scrubbing, rinse the tube with clean water to remove any soap residue. Ensure that all the soap is completely washed out.
- In a separate bowl, prepare a cleaning solution by mixing warm water with a small amount of bleach or hydrogen peroxide. Submerge the bite valve into this solution, making sure it is completely covered. Let it soak for at least 15-20 minutes to kill any bacteria or mold.
- Rinse the bite valve thoroughly with clean water to remove the cleaning solution. Ensure that no bleach or peroxide residue remains.
- After cleaning, hang the hydration tube and bite valve to air dry completely. Make sure they are fully dry before reattaching them to the reservoir or backpack.
Remember, regular cleaning and maintenance are essential to ensure the longevity and hygiene of your hydration system.
What is the best cleaning solution for my hydration tube and bite valve?
There are several highly recommended cleaning solutions for hydration tubes and bite valves. Here are a few options:
- Warm Soapy Water: The simplest and most common method is to clean with warm soapy water. Use mild dish soap or a specialized cleaning agent and gently scrub the tube and bite valve with a cleaning brush or soft cloth. Rinse thoroughly with clean water afterward.
- Baking Soda Solution: Create a mixture of baking soda and warm water to form a paste-like consistency. Apply this mixture to the tube and bite valve and scrub gently. Rinse with clean water to remove any residue.
- Vinegar Solution: Mix equal parts white vinegar and water to create a cleaning solution. Submerge the hydration tube and bite valve in this solution for about 30 minutes, then rinse thoroughly with clean water.
- Hydrogen Peroxide Solution: Make a mixture of equal parts hydrogen peroxide and water. Soak the hydration tube and bite valve in this solution for 30 minutes, then rinse well with clean water.
Remember to always consult the manufacturer's instructions or guidelines before using any cleaning solution on your specific hydration system.
What is the correct water-to-vinegar ratio for cleaning the hydration tube?
The recommended water-to-vinegar ratio for cleaning the hydration tube is typically 1:1 or equal parts water and vinegar. This mixture helps to dissolve any residue or buildup inside the tubing effectively.
What is the ideal frequency to replace the bite valve?
The ideal frequency to replace a bite valve can vary depending on the frequency of use, the type and quality of the bite valve, and the individual's personal preference. However, a general guideline is to replace the bite valve every 3 to 6 months if used regularly. If you notice any signs of wear, damage, or if the bite valve begins to affect the taste or functionality of your hydration system, it is advisable to replace it sooner. It is also recommended to clean and maintain the bite valve regularly to ensure its longevity.
What is the best method to clean a hydration tube with a narrow opening?
One of the best methods to clean a hydration tube with a narrow opening is to use a cleaning kit specifically designed for hydration systems. Here's a step-by-step guide on how to effectively clean a hydration tube:
- Gather the necessary supplies: a hydration system cleaning kit (includes a cleaning brush and cleaning tablets), warm water, mild soap, and a small container (optional).
- Disconnect the hydration tube from the bladder or reservoir if necessary.
- Fill the container with warm water and add a small amount of mild soap. Mix it well to create a soapy solution.
- Dip the cleaning brush into the soapy solution and shake off any excess liquid.
- If available, use the brush to scrub the inside of the narrow opening carefully. Gently move the brush back and forth to dislodge any residue.
- Repeat this process multiple times, rinsing the brush with warm water and adding more soapy solution if needed.
- Once the inner part of the tube is scrubbed properly, rinse the hydration tube with warm water thoroughly. Ensure that all soap residue is removed.
- If your cleaning kit includes cleaning tablets, dissolve the recommended amount in warm water as per the instructions on the packaging.
- Carefully insert the cleaning brush into the narrow opening of the tube, attaching it to the handle if necessary. Use the brush to thoroughly clean the entire length of the tube by gently scrubbing back and forth.
- After cleaning, rinse the hydration tube again with warm water to remove any remaining cleaning solution or tablet residue.
- Once rinsed, hang the hydration tube upside down somewhere clean and well-ventilated to air dry completely. Make sure there's no moisture trapped within the narrow opening.
By following these steps and using a cleaning kit specifically designed for hydration tubes, you should be able to effectively clean and maintain your hydration system.
What is the proper way to maintain a hydration tube and bite valve?
Proper maintenance of a hydration tube and bite valve is essential to ensure the longevity and hygienic use of your hydration system. Here are some steps to follow:
- Cleaning: After each use, detach the hydration tube and bite valve from the reservoir or bladder. Rinse them thoroughly with warm water to remove any leftover fluids or residue.
- Unclogging: If the bite valve or tube gets clogged, use a soft brush or pipe cleaner to gently scrub the inside. Avoid using harsh chemicals or strong cleaners.
- Disassembly: Disassemble the bite valve as per the manufacturer's instructions. This usually involves removing parts like the silicone cover, locking mechanism, and sealing ring. Be sure to remember the order in which the valve was dismantled.
- Soaking: Fill a bowl or sink with warm water and add a small amount of mild dish soap. Soak all the disassembled parts in the soapy water for around 15-30 minutes to dissolve any lingering bacteria or stubborn deposits.
- Scrubbing: Use a soft brush to scrub the bite valve and tube, paying particular attention to any crevices or hard-to-reach areas. Ensure you clean both the inside and outside surfaces of the parts.
- Rinsing: Thoroughly rinse all the cleaned parts with warm water, making sure there is no soap residue left behind.
- Drying: Allow all the components to air dry completely before reassembling or storing. Ensure there is no moisture trapped inside the tube or bite valve.
- Storage: Once dry, reattach the bite valve to the hydration tube, and then reconnect the tube to the reservoir or bladder. Store the hydration system in a clean and dry place, away from direct sunlight.
Remember to consult the specific maintenance instructions provided by your hydration system's manufacturer, as different brands may have slightly different care requirements.
What is the proper technique to clean the inside of the hydration tube?
Cleaning the inside of a hydration tube is important to prevent bacteria growth and maintain the quality of the water. The following steps can be followed to clean the inside of a hydration tube:
- Gather the necessary supplies: You will need a bottle brush or a specialized hydration tube cleaning brush, hot water, mild dish soap, and a cleaning solution (e.g., hydrogen peroxide or a specialized hydration tube cleaning product).
- Disconnect the hydration tube: Remove the tube from the hydration system or backpack.
- Empty and rinse the tube: Empty any water remaining in the hydration tube and rinse it with clean water to remove any debris or residue.
- Prepare the cleaning solution: If using a cleaning solution such as hydrogen peroxide, mix it with water as per the product instructions. If you have a specialized hydration tube cleaning product, follow the instructions mentioned on the packaging.
- Clean the tube with a brush and cleaning solution: Pour the cleaning solution into the hydration tube and use the brush to scrub the inside thoroughly. Pay specific attention to the areas near the mouthpiece and any bends or crevices in the tube. Scrubbing the inside thoroughly will help remove any dirt, buildup, or bacteria.
- Rinse the tube: After scrubbing, thoroughly rinse the hydration tube with clean water to remove the cleaning solution and any loosened debris.
- Disinfect the tube (optional): To further ensure cleanliness, you can disinfect the tube by soaking it in a mixture of water and disinfecting tablets or using sterilizing liquid approved for hydration system cleaning. Follow the product instructions for proper disinfection.
- Dry the tube: Allow the hydration tube to air dry completely before reconnecting it to the hydration system or storing it. Hang it in a well-ventilated area to facilitate drying and avoid any musty smells.
Regularly cleaning the hydration tube, at least after every use, will help keep it in good condition and ensure optimal hygiene.