Best Color Grading Tools to Buy in July 2026

COLOR MUSE Colorimeter - Mobile Color Matching Tool - Instantly identify closest matching paint colors, products, and digital color values
-
PORTABLE SCANNING ANYWHERE: FIND MATCHING PAINT COLORS ON-THE-GO.
-
ACCURATE COLOR MATCHES: OVER 90% ACCURACY FOR CONFIDENT SELECTIONS.
-
EXTENSIVE PRODUCT LIBRARY: ACCESS TOP BRANDS FOR ENDLESS COLOR CHOICES.


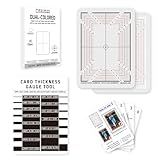
Card Centering Grading Tool – Sports Cards Grading Kit with Card Centering Grading Tool, Thickness Measuring Card, Sports Card Inspection Kit, and Trading Card Measuring Tools for PSA BGS Grading
- ACHIEVE PRECISE GRADING WITH HIGH-DETAIL 30X CLARITY TOOLS TODAY!
- EASY MEASURING WITH UPDATED GUIDES ENSURES PERFECT CARD CENTERING!
- PROFESSIONAL HANDLING GLOVES AND CLOTHS PROTECT YOUR VALUABLE CARDS!
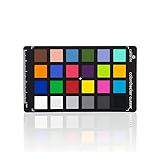
Calibrite ColorChecker Classic Color Reference Target for Photo/Video Color Accuracy, 24 Patch Chart for White Balance and Color Grading, 8 x 11.5 inch Profile Creation and Editing Workflow Tool (CCC)
- ACHIEVE PERFECT COLOR ACCURACY WITH 24 SCIENTIFICALLY FORMULATED PATCHES.
- SIMPLIFY WHITE BALANCE ADJUSTMENTS FOR CONSISTENT, TRUE-TO-LIFE RESULTS.
- STREAMLINE EDITING WORKFLOWS WITH CUSTOM DNG AND ICC PROFILE CREATION.
10 Colors GIA Master Set 10CT Diamond Color Grading Grader Color Tester Tool Professional Jeweler D-M Grader Set for Jewelry Appraisal Institutions, Training Institutions, Store Grading Control
- ACCURATELY TESTS DIAMOND COLORS AGAINST GIA SCALE FOR CONFIDENCE.
- ESSENTIAL TOOL FOR JEWELERS TO ENHANCE DIAMOND SALES QUALITY.
- IDEAL FOR TRAINING, APPRAISAL, AND STORE GRADING OF GEMSTONES.

DGK Color Tools WDKK Waterproof Color Chart Warm Card Kit with Premium Lanyard
- WATERPROOF DESIGN ENSURES DURABILITY FOR OUTDOOR AND UNDERWATER USE.
- 18% GRAY AND COLOR PATCHES ENHANCE COLOR ACCURACY AND CORRECTION.
- WARM CARD IMPROVES SKIN TONES FOR PROFESSIONAL-QUALITY PHOTOGRAPHY.
Calibrite ColorChecker Classic Mini Color Reference Target for Photo and Video Accuracy, 24 Patch Chart for White Balance/Color Grading, Compact Size for Travel and Production Workflows (CCC-MINI)
-
COMPACT DESIGN: EASY TO TRANSPORT FOR ACCURATE COLOR IN ANY SETTING.
-
WHITE BALANCE CONTROL: REDUCES COLOR CAST ISSUES FOR CONSISTENT SHOTS.
-
PROFILE CREATION READY: CUSTOM PROFILES STREAMLINE COLOR MATCHING AND EDITING.
Flinduy Anime Collectible Cards Grading Tool with Cleaning Kit, PSA Standard Size Centering System for Standard Trading Cards, Precision Centering Grading Tools Set
-
ENHANCED ACCURACY: IMPROVED 0.5MM GRID SPACING FOR PRECISE GRADING.
-
USER-FRIENDLY DESIGN: STREAMLINED SETUP WITH FULL-COLOR GUIDES INCLUDED.
-
FREE EXPERT CONSULTATION: GET PROFESSIONAL GRADING ADVICE WITH YOUR PURCHASE.

HD-GEAR Centering Tool Pro Card Grading Kit PSA Pokemon Trading Cards TCG Black & White Set for Standard Size Cards
- ACHIEVE PERFECT CARD ALIGNMENT WITH OUR RELIABLE CENTERING TOOL!
- CRAFTED IN JAPAN: SUPERIOR QUALITY FOR ALL YOUR CARD GRADING NEEDS.
- EASY-TO-SEE GUIDE LINES ENSURE PRECISION FOR ANY CARD TYPE.
BDJBXK Card Centering Grading Tool, Sports Cards Grading Kit, Thickness Measuring Card, Includes Two Sets of Sports Trading Cards Measuring Tools and Point Gauge Tool (with Instructions)
- PEEL OFF PROTECTIVE FILM FOR FLAWLESS CARDS-CUSTOMER SATISFACTION ASSURED!
- PRECISION TOOLS ENSURE ACCURATE GRADING FOR COLLECTORS AND PROFESSIONALS.
- EXCLUSIVE CONTENT PROTECTED BY COPYRIGHT-INVEST CONFIDENTLY TODAY!
TOUR BOX Elite Plus - iPad Drawing Bluetooth Controller, Video Editing Photo Color Grading Speed Editor, Programmable Creative Console Keyboard for DaVinci Procreate Adobe Softwares and More
- 3-IN-1 WORKFLOW: SEAMLESS CREATIVITY ON IPAD, MAC, AND WINDOWS ANYTIME.
- INDUSTRY EXPERTISE: 7 YEARS REDEFINING DIGITAL PAINTING AND EDITING.
- ERGONOMIC EFFICIENCY: BOOST CREATIVITY WITH 170% MORE DRAWING SPEED!
To change the color in Adobe Premiere Pro, follow these steps:
- Import your video clip or image into the timeline.
- Go to the "Effects" panel, usually located on the right side of the screen.
- Expand the "Video Effects" folder, then the "Color Correction" folder.
- You'll find various color adjustment effects, such as "Brightness & Contrast," "Curves," "Hue/Saturation," and more. Choose the effect you want to apply by dragging and dropping it onto your video clip or image in the timeline.
- Once the effect is applied, you'll see its options in the "Effect Controls" panel, which is usually located above the timeline.
- Adjust the settings of the effect to change the color of your video clip or image. For example, if you want to change the brightness, drag the "Brightness" slider to the left or right.
- You can use multiple color adjustment effects to achieve the desired color change. Experiment with different effects and settings until you're satisfied.
- If you only want to change the color of a specific part of the video, you can use the "Mask" feature. Select the video clip or image in the timeline, go to the "Effect Controls" panel, click the "Pen" icon next to "Mask," and draw a mask around the area you want to modify. Then, adjust the color effects within the mask to apply changes only to that portion.
- Preview your changes by playing the video in the preview window. Make further adjustments if needed.
- Once you're happy with the color change, export your video by going to File > Export > Media and choosing the desired format and settings.
Remember to save your project regularly to avoid losing your progress.
Can I change the color of an entire video at once?
Yes, you can change the color of an entire video at once using video editing software. Most advanced video editing software programs have features that allow you to adjust the color grading and color correction of a video. These tools typically provide options to modify parameters such as brightness, contrast, saturation, and hue, allowing you to change the overall color tone of the video to your desired aesthetic. Keep in mind that the availability of such color adjustment features may vary across different software applications.
How do I undo any color changes I made in Premiere Pro accidentally?
To undo any color changes you made accidentally in Premiere Pro, you can follow these steps:
- Locate the "History" panel: Go to the "Window" menu and select "History" to open the History panel. If the panel is already visible, you can skip this step.
- Check the steps in the History panel: The History panel will display a list of actions you performed in chronological order. Review the actions to find the color changes you want to undo.
- Select the step to undo: Identify the specific action from the History panel that resulted in the color change you want to undo.
- Click on the appropriate step: Click on the step in the History panel that led to the color change. This will revert the project to its state before the color change.
- Confirm the undo: After clicking on the appropriate step, Premiere Pro will confirm if you want to perform the undo action. Click "Yes" or "OK" to undo the color change.
Your color changes should now be undone, and your project will revert to the state it was in before the accidental color changes were made.
Is there a way to save my color adjustments as a preset for future use?
Yes, most image editing software allows you to save your color adjustments as a preset for future use. Here's a general process of how to do it:
- Open your image in an image editing software (such as Adobe Photoshop, Lightroom, or GIMP).
- Make the desired color adjustments (e.g., brightness, contrast, saturation, etc.) to achieve the desired look.
- Once you are satisfied with your adjustments, navigate to the presets panel or menu in the software.
- Look for an option to save or create a new preset.
- Give your preset a name and choose the settings you want to include in the preset (e.g., only color adjustments or other settings like sharpening or noise reduction).
- Save the preset.
- Now, in the future, you can simply apply that preset to any other image to quickly apply the same color adjustments.
Note that the exact location and steps may vary depending on the software you are using, so it's a good idea to refer to the software's documentation or seek specific instructions for your particular software version.
Which menu should I navigate to for color changing options?
To find color changing options, you should navigate to the "Settings" or "Preferences" menu, and then look for a section called "Appearance" or "Display". From there, you may find options to customize the color scheme, wallpaper, or theme of your device or application.
Is it possible to make skin tones appear more natural in Premiere Pro?
Yes, it is definitely possible to make skin tones appear more natural in Premiere Pro. There are several techniques and tools you can use within the software to achieve this:
- Color Corrector: Use the Color Corrector effect in Premiere Pro to adjust the overall color balance of the footage. This can help you correct any color casts or sallow tones in the skin.
- Curves: The Curves effect allows you to adjust the tonal range of the image, making it easier to fix any color imbalances. You can use it to tweak the red and green channels to enhance the skin tones.
- Hue/Saturation Curves: Use the Hue/Saturation Curves to fine-tune specific color ranges. You can isolate the skin tones and adjust their saturation and hue to make them look more natural.
- Color Wheels: The built-in Color Wheels in Premiere Pro offer easy controls to modify the shadows, midtones, and highlights of an image. You can use them to fine-tune the skin tones by adjusting the balance of the red, green, and blue channels.
- Secondary Color Correction: Premiere Pro also provides tools like the Lumetri Color panel that allow you to perform secondary color correction. You can isolate the skin tones using masks and make precise adjustments to them.
Remember, achieving natural-looking skin tones will depend on the quality of the original footage, lighting conditions during the shoot, and your own artistic preferences. Always reference a reference photo or make adjustments based on what you perceive as natural.
What are the options to adjust the contrast in Premiere Pro?
In Adobe Premiere Pro, there are several options to adjust the contrast of a video clip. Here are the main methods:
- Lumetri Color panel: This panel provides extensive control over the color and contrast of your footage. After selecting the clip, you can open the Lumetri Color panel by navigating to the Color workspace or by going to Window > Lumetri Color. In the panel, you can adjust the contrast using the Contrast slider, or you can fine-tune it using the Curves tool.
- Three-Way Color Corrector effect: This effect allows you to adjust the shadows, midtones, and highlights separately. You can find this effect by selecting the clip, going to the Effects panel, and searching for "Three-Way Color Corrector". By adjusting the gain for each color range, you can modify the contrast.
- Brightness & Contrast effect: Under the Effects panel, search for "Brightness & Contrast" and apply it to your clip. This effect provides basic adjustments for brightness and contrast levels. Simply adjust the contrast slider to achieve your desired result.
- Fast Color Corrector effect: This effect allows you to adjust the overall color balance and contrast of your footage. To access it, search for "Fast Color Corrector" in the Effects panel. By moving the Contrast slider to the desired value, you can change the contrast of your clip.
Remember, the effectiveness of these options may vary depending on the specific characteristics of your footage. Experimenting with different settings and combinations of effects can help you achieve the desired contrast adjustment in Adobe Premiere Pro.
Is it possible to match the color of two different clips in Premiere Pro?
Yes, it is possible to match the color of two different clips in Adobe Premiere Pro. Premiere Pro provides several tools and features to help you achieve color matching or color grading.
One of the tools you can use is the Lumetri Color panel. By applying the Lumetri Color effect to a clip, you can make adjustments to its exposure, color balance, saturation, and more. You can then save those adjustments as a LUT (Look-Up Table) and apply it to other clips to match their colors.
To match the color between two different clips, follow these steps:
- Place both clips in the timeline.
- Select the clip you want to match the color from.
- Go to the Color workspace by clicking on the Color tab above the timeline.
- Open the Lumetri Color panel if it is not already visible (Window > Lumetri Color).
- Make adjustments to the exposure, color, saturation, etc., in the Lumetri Color panel until you achieve the desired look.
- Once you're satisfied, click on the three-dot menu icon in the panel and select "Export LUT."
- Save the LUT to a desired location on your computer.
- Select the clip(s) you want to match the color to.
- Apply the Lumetri Color effect to the selected clip(s).
- In the Lumetri Color panel, browse for the LUT you saved earlier by clicking on the "Browse" button next to the Creative section.
- Select the LUT you created and it will be applied to the selected clip(s), matching their colors to the reference clip.
By using this method and experimenting with the available tools, you can effectively match the color between different clips in Adobe Premiere Pro.