
Best Above-Ground Pool Kits to Buy in July 2026
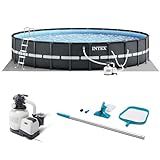
INTEX 26329EH Ultra XTR 18ft x 52in Above Ground Swimming Pool Set with Sand Filter Pump and Cleaning Maintenance Kit
- BUILT TO LAST: GALVANIZED STEEL FRAME WITH 2-YEAR WARRANTY INCLUDED!
- EFFORTLESS CLEANING: INTERCHANGEABLE HEADS WITH 94-INCH TELESCOPING SHAFT.
- QUICK SETUP: SNAP-TOGETHER DESIGN WITH NO TOOLS NEEDED FOR ASSEMBLY!


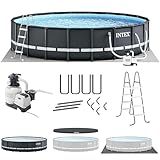
INTEX 26333EH Ultra XTR Deluxe Above Ground Swimming Pool Set: 20ft x 48in – Includes 2100 GPH Cartridge Sand Filter Pump – SuperTough Puncture Resistant – Rust Resistant – Easy to Assemble
- UNMATCHED DURABILITY: GALVANIZED STEEL FRAME WITH 2-YEAR WARRANTY!
- QUICK ASSEMBLY: READY FOR WATER IN JUST 60 MINUTES!
- SUPERIOR FILTRATION: KRYSTAL CLEAR SAND FILTER FOR PRISTINE WATER!
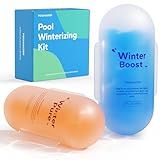
3 in 1 Winter Closing Kit - Pool Winterizing Kit for Above Ground Pool and inground Pools, Easy to Use - Up to 30,000 Gallon
- MAINTAIN CRYSTAL-CLEAR POOL WATER FOR NEXT SEASON EFFORTLESSLY!
- SIMPLIFY POOL OPENING-SAVE TIME, LABOR, AND COSTS EVERY YEAR!
- FITS ANY POOL SIZE-PROTECT YOUR INVESTMENT WITH EASE!

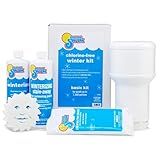
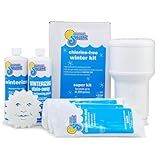
In The Swim Pool Closing Kit - Winterizing Chemicals for Above Ground and In-Ground Pools - Up to 15,000 Gallons
- ALL-IN-ONE KIT SAVES TIME AND CHEMICALS FOR HASSLE-FREE CLOSING.
- SAFE FORMULA PROTECTS POOL SURFACES WITHOUT CHEMICAL CONFLICTS.
- VERSATILE KITS AVAILABLE FOR ANY POOL SIZE, EVEN OVER 35,000 GALLONS.
In The Swim Pool Closing Kit - Winterizing Chemicals for Above Ground and In-Ground Pools - Up to 7,500 Gallons
- STREAMLINED CLOSING: ALL NECESSARY CHEMICALS INCLUDED FOR EASY WINTERIZATION.
- SAFE FOR YOUR POOL: PROTECTS WITHOUT RISKING DAMAGE TO SURFACES OR CHEMICALS.
- VERSATILE SIZES: SUITABLE FOR ALL POOL SHAPES AND SIZES, UP TO 35,000+ GALLONS.
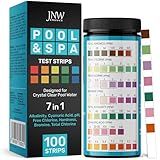
JNW 7-in-1 Pool Test Strips, 100 Quick & Accurate Test Strips for Pool Water, Spa Test Strips for Hot Tub, Chlorine Test Strips, Bromine, pH, Alkalinity, Hardness & More - Swimming Pool Test Kit
- ALL-IN-ONE AFFORDABILITY: 7-IN-1 TESTING FOR POOL WATER CHEMISTRY!
- EASY TO USE: DIP, WAIT, COMPARE-ACCURATE RESULTS IN 32 SECONDS!
- FREE EBOOK: EXPERT TIPS FOR BALANCED POOL AND SPA MAINTENANCE!
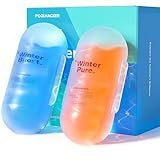
Winter Pool Closing Kit - 3 in 1 Winterizing Care for Above Ground Pool and inground Pools, Long-Lasting & Safe for 15,000 Gallons
- EFFORTLESS WINTER PREP: JUST DROP, COVER, AND FORGET!
- 3-IN-1 FORMULA: MAINTAIN WATER BALANCE ALL WINTER LONG!
- FAMILY-FRIENDLY: SAFE FOR KIDS AND PETS, WORRY-FREE CARE!
In The Swim Pool Closing Kit - Winterizing Chemicals for Above Ground and In-Ground Pools - Up to 35,000 Gallons
-
ALL-IN-ONE KIT SAVES TIME AND REDUCES CHEMICAL WASTE EFFORTLESSLY.
-
SAFE PROTECTION ENSURES NO DAMAGE TO POOL SURFACES OR EQUIPMENT.
-
SUPERIOR OIL ABSORPTION PREVENTS UNSIGHTLY WATERLINE SCUM BUILD-UP.
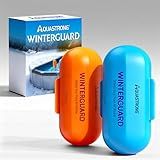
AQUASTRONG 4 in 1 Pool Closing Kit for Above Ground & Inground Pools, Treats up to 30,000 Gallons, Easy-to-Use Pool Winterizing Kit for Winter Care & Maintenance
-
EFFORTLESS CLEANUP: ENJOY 6 MONTHS OF CRYSTAL-CLEAR WATER; NO MESS, NO STRESS!
-
COST-EFFECTIVE SOLUTION: SAVE MONEY ON CHEMICALS AND MAINTENANCE WITH AQUASTRONG!
-
SAFE FOR EVERYONE: NON-TOXIC FORMULA ENSURES SAFETY FOR FAMILY AND PETS!
AquaJoyer Professional Pool Winter Closing Kit, Winterizing Kit, Close Your Above Ground or Inground Pool with Ease, Up to 30,000 Gallons
- ✨ SPARKLING POOL READY FOR SPRING-SAY GOODBYE TO CLOUDY WATER!
- 🧊 REDUCE REOPENING TIME BY 80% FOR A STRESS-FREE START TO SUMMER!
- 🍃 FAMILY-SAFE FORMULA LETS EVERYONE ENJOY THE POOL WORRY-FREE!
Yes, it is possible to install an above-ground pool yourself. However, keep in mind that it will require some manual labor and basic construction skills. Installing an above-ground pool typically involves the following steps:
- Selecting a suitable location: Choose a spot in your yard that is level and free from any obstructions such as trees or underground utilities. Ensure there is enough space around the pool for easy access and maintenance.
- Preparing the site: Clear the area of any grass, rocks, or debris. Use a shovel or a rake to level the ground if necessary. You may also need to add a layer of sand or a base material to create a smooth and even surface.
- Assembling the pool: Carefully follow the manufacturer's instructions to assemble the pool walls, frames, and supports. This typically involves securing the metal or resin components together using nuts, bolts, or connectors. Some pools may also require the installation of a liner or a bottom pad.
- Installing the filter system: Connect the pump, filter, and skimmer according to the manufacturer's instructions. This involves connecting hoses, ensuring proper seals, and setting up any necessary plumbing connections. Make sure the system is securely in place and all electrical connections are done properly.
- Filling and leveling: Slowly fill the pool with water using a garden hose, while periodically checking for any leaks in the plumbing or liner. As the pool fills, check for and correct any unevenness or leaning by adjusting the supports or adding additional base material.
- Final touches: Once the pool is filled, complete any finishing touches like attaching the ladder or handrails. You may also need to perform some basic water treatment tasks, such as adding chlorine or balancing the pH levels, to ensure the water is safe for swimming.
It's worth noting that larger above-ground pools may require additional assistance or specialized equipment during installation. Additionally, local regulations and building codes may need to be considered before proceeding with the installation. Therefore, it's advisable to consult the manufacturer's instructions and potentially seek professional advice if needed.
What is the best time of year to install an above-ground pool?
The best time of year to install an above-ground pool is typically during the spring or early summer. This allows for pleasant weather conditions and enough time to set up the pool before the peak swimming season. Additionally, installing the pool before the summer heat begins ensures that you can fully enjoy it as soon as the temperature rises.
What is the process of assembling the pool walls and frame?
Assembling the pool walls and frame typically involves the following steps:
- Preparing the area: Ensure that the ground is level and free of any debris, rocks, or sharp objects that could potentially damage the pool liner or frame. Remove any grass or vegetation from the area.
- Lay out the pool frame: Lay out the pieces of the pool frame according to the manufacturer's instructions. Typically, the frame consists of metal or resin rails and supports that interlock or fasten together.
- Connect the frame pieces: Start connecting the frame pieces according to the manufacturer's instructions. This may involve sliding rails into connectors, using screws or bolts, or snapping them together. Follow the recommended sequence to ensure proper alignment and stability.
- Install bottom rails: Place the bottom rails along the perimeter of the pool area, using connectors or fasteners provided with the pool kit. These rails are essential for supporting the weight of the pool walls and creating a secure foundation.
- Attach vertical supports: Install the vertical supports or posts, usually made of metal or resin, at regular intervals around the perimeter. These posts provide structural integrity to the pool walls and help to maintain their shape.
- Insert wall panels: Carefully insert the pool wall panels into the bottom rails, ensuring they fit snugly and securely. Depending on the pool design, the panels may have interlocking tabs or be fastened with screws or brackets.
- Secure the wall panels: Once all wall panels are in place, secure them to the posts or vertical supports as instructed. This may involve brackets, screws, or other fastening mechanisms. Ensure that the wall panels are properly aligned and leveled.
- Leveling and adjusting: Check the level of the pool frame and adjust as necessary by adding or removing fill material underneath the bottom rails. This step ensures that the pool is perfectly level, which is crucial for proper water distribution and overall stability.
- Secure the top rails: Install the top rails onto the vertical supports or wall panels, ensuring they are connected securely and evenly. These top rails provide additional stability and support to the pool walls.
- Check for proper alignment: Before proceeding, double-check the alignment and squareness of the pool walls and frame. Ensure that all connections are tight and secure.
- Continue with additional pool features: Depending on the type of pool and specific design, additional features such as integrated steps, skimmers, or filtration systems may need to be installed. Follow the manufacturer's instructions for each component.
It is important to note that the specific assembly process may vary depending on the pool design and manufacturer's instructions provided with the pool kit. Always refer to the manufacturer's manual for the most accurate and detailed instructions for your specific pool model.
How to choose the perfect location for an above-ground pool installation?
Choosing the perfect location for an above-ground pool installation involves considering various factors. Here are some steps to help you make the right decision:
- Survey the area: Start by assessing the available space in your backyard. Consider the size, shape, and layout of the area.
- Ensure accessibility: Choose a location that provides easy access to the pool. It should have a clear path from your home, preferably without any obstacles or tight spaces.
- Evaluate sunlight exposure: Look for an area with adequate sunlight exposure. Sunlight is essential for heating the pool and preventing the growth of algae. Avoid placing the pool in shaded areas or directly under trees.
- Assess ground conditions: The ground should be level and stable. Avoid areas with slopes, large rocks, or tree roots that can cause issues during the installation or affect the pool's stability.
- Check for utility lines: Prior to installation, call utility companies to locate and mark any underground utility lines. This will help you avoid any potential damage and ensure a safe installation.
- Consider privacy: Determine if you prefer a more private or open pool experience. Depending on your preference, place the pool where it receives a sufficient amount of privacy or where it can be easily seen from your home.
- Evaluate the surroundings: Take into account the surrounding landscape. Avoid placing the pool near areas prone to excessive debris, such as trees that shed a lot of leaves or seeds. Additionally, consider the view from the pool and choose a location that offers a pleasant backdrop.
- Ensure proximity to utilities: If the pool requires a pump or filtration system, make sure the installation location is close to an electrical outlet. It should also be within reach of a water source for easy filling and cleaning.
- Check local regulations: Before finalizing your location, review any local building codes or legal requirements regarding pool installations. This will help ensure compliance and avoid any complications.
- Consult a professional: If you are unsure about the best location or face specific challenges, consider seeking advice from a professional pool installer or contractor. Their expertise can provide guidance and support during the decision-making process.
By following these steps and assessing your specific circumstances, you can choose the perfect location for your above-ground pool installation.
How to winterize an above-ground pool?
Winterizing an above-ground pool is essential to protect it from the cold temperatures, snow, and ice during winter. Here are the steps to winterize your above-ground pool:
- Clean the pool: Start by thoroughly cleaning the pool. Remove any leaves, debris, and dirt from the surface and bottom of the pool. This will prevent organic matter from decaying and causing issues during winter.
- Balance the water chemistry: Test the water and make sure the pH, alkalinity, and calcium hardness levels are properly balanced. Adjust them if necessary by adding pool chemicals according to the manufacturer's instructions.
- Lower the water level: Use a pump or siphon to lower the water level below the skimmer and return jets. This prevents any potential freezing and damage to these components.
- Drain the equipment: Completely drain the filtration system, including the pump, filter, heater, and any other equipment. Follow the manufacturer's instructions for proper draining to avoid damage.
- Remove and clean accessories: Remove all accessories from the pool, such as ladders, slides, or diving boards. Clean them thoroughly and store them in a dry area until the pool is reopened.
- Winterize the plumbing: Disconnect and remove all hoses, such as skimmer hoses and return jet fittings. Ensure they are drained completely and clean them before storing. Use winterizing plugs or rubber expansion plugs to seal all openings in the pool and equipment to prevent water from getting inside.
- Add winterizing chemicals: Add winterizing chemicals as per the manufacturer's instructions to prevent algae growth and to keep the water sanitized during the winter months. These chemicals typically include a winter algaecide and a winterizing shock.
- Cover the pool: Install a winter pool cover securely over the pool. Choose a cover specifically designed for above-ground pools that can withstand winter weather conditions. Make sure it is tightly fastened to keep out debris, leaves, and snow.
- Inspect and protect the pool cover: Ensure the cover is not torn or damaged. Use air pillows or other devices to create a slight slope on the pool cover. This allows rainwater or snow to drain off the cover and prevents excessive weight that could potentially damage it.
It's essential to follow the manufacturer's instructions for your specific pool and equipment when winterizing. Additionally, considering local climate conditions may also influence the steps you take to prepare your pool for winter.
How to protect an above-ground pool from extreme weather conditions?
Protecting an above-ground pool from extreme weather conditions can help prolong its lifespan and prevent damage. Here are some steps you can take:
- Secure the pool cover: Invest in a high-quality pool cover that fits your above-ground pool properly. Ensure it is tightly secured with straps or cables to prevent it from being blown away by wind or torn off during storms.
- Reinforce the pool walls: Check the pool walls for any weak spots or areas that require reinforcement. Use additional support, such as horizontal braces or stakes, to strengthen the structure against strong winds.
- Lower the water level: Before severe weather arrives, lower the pool water level to prevent it from overflowing during heavy rainfall or flooding. This will also reduce the risk of damage to the pool's walls or liner.
- Remove any potential projectiles: Clear the surrounding area of the pool from any loose items or debris that could become projectiles during high winds. This includes patio furniture, plant pots, and toys.
- Install windbreak fences or barriers: Erecting fences or windbreak panels around the pool area can provide additional protection from strong gusts of wind. These barriers can help divert wind flow and prevent damage to the pool and its surrounding structures.
- Monitor and maintain the pool: Regularly inspect the pool for any signs of damage or wear, especially after extreme weather events. Repair any leaks, tears, or loose components promptly to prevent further issues.
- Follow manufacturer guidelines: Adhere to the manufacturer's instructions and recommendations for maintenance and care of your specific above-ground pool model. This includes winterizing the pool correctly if needed.
In addition to these steps, it is always wise to consult local experts or pool professionals who are familiar with the weather patterns of your specific location. They can provide tailored advice on protecting your above-ground pool from extreme weather conditions.
What is the estimated time required for an above-ground pool installation?
The estimated time required for an above-ground pool installation can vary depending on various factors such as the size and type of the pool, the complexity of the installation, the availability of equipment and manpower, and the experience of the installation team. On average, it can take anywhere from 1 to 3 days for a professional installation team to complete the installation. However, it is important to consult with the specific manufacturer or installation professionals to get an accurate estimate for your particular pool and installation requirements.